
Self-hosting: Publishing privately to Friends & Family


This article (part 3) will walk-through how to set-up an application that you want to allow your friends and family to access over the internet without exposing it to the wider public internet. In this case, the application to share is 'Jellyfin', think of it like Netflix or Plex but it is Open Sourced.
The guide introduces Tailscale, an application that creates device to device private connectivity similar to a VPN, to remove the need to expose any services unnecessarily whilst applying 'Access Control Lists' to ensure people you invite only access devices / ports you want to share.
Scenario: I want to host and share an app from my home to my friends and family
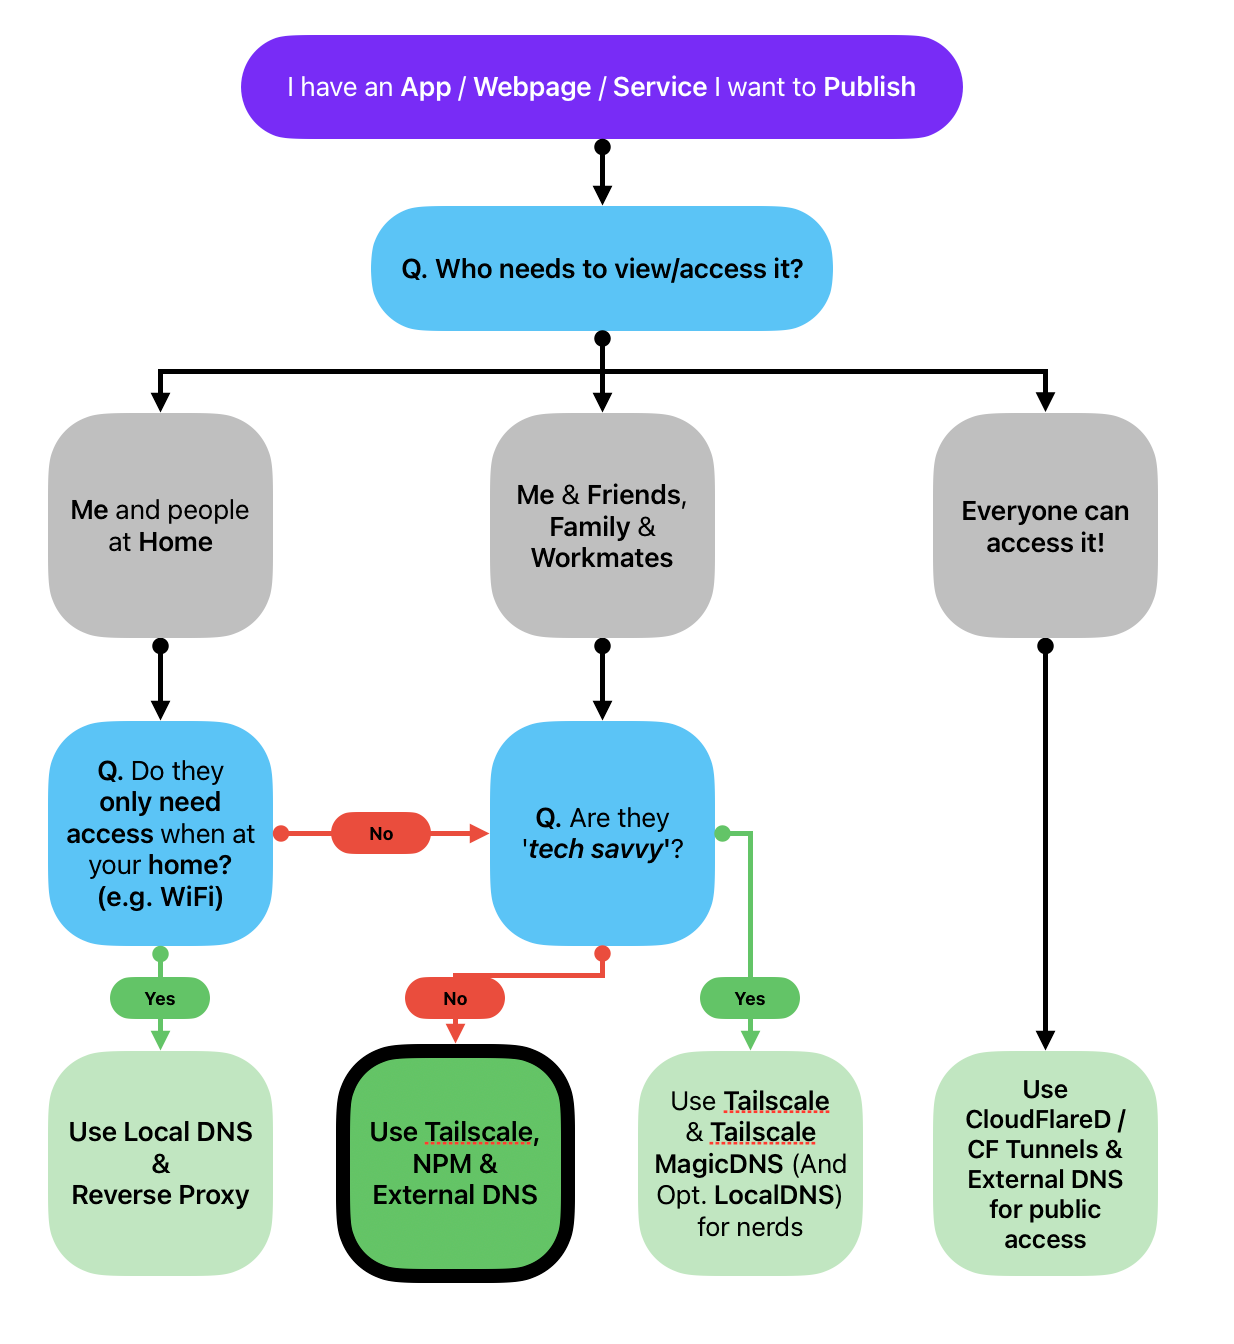
Below are some questions I asked myself before venturing on this journey:
- What app/service am I hosting? A service to watch videos
- Why am I hosting it? Cause I want to share my videos / data with my friends securely
- Who is/are the user(s)? Me & my friends. We want to watch entertainment from anywhere!
- Where will the user(s) access it? My friends should be able to access it from the internet, any device, anywhere, anytime
- Is it worth hosting this myself? Yes, cause subscriptions suck
Difficulty, Tech Stack & Requirements
- Difficulty: Novice to intermediate Enthusiast. You will need to understand your way around a terminal. Know basics of
sshand terminal text-based editors and how to troubleshoot yourself - Time Required: 60 minutes
- Tech Stack / Requirements:
- A computer with a internet connection and a network
- Internal DNS - E.g. Local router or DNS server and admin access to update it
- A computer host that can run Ubuntu Server OS - it will be our Docker proxy host that is preferably separate from your Jellyfin host
- A computer with a internet connection and a network
- An External DNS domain name (Just use CloudFlare DNS, approx. $20AUD a year)
- Apps:
- Docker, a container virtualisation software, this should already be installed (free)
- Jellyfin, a free and open source application that is like Plex or Netflix, should already installed
- NGINX Proxy Manager, a free and open source GUI-based reverse proxy used to provide SSL certs and serve sites over 443, covered in article 1.
- New: Tailscale, a popular Device to Device based "VPN" (free)
- Cloudflared DNS, ensures people outside your local network go via the Tailscale Tailnet (paid) and covered in article 2.
Disclaimer 1: This article is recommended for enthusiasts that are willing to dive a little deeper, due to the nature of Jellyfin there are rabbit holes for 'volumes vs bind mounts for storage of media', enabling 'hardware acceleration for encoding' and other tangents which is dependent on the hardware you have for your system. You must be willing to RTFM and use Google-fu (or an AI these days) to overcome the obstacles.
Disclaimer 2: This article aims to provide new users a simple way to share services whilst teaching basics like network segmentation, network ACLs and DNS. There are definitely more robust and customisable ways to achieve the end outcome, this is merely one.
Technical Steps
This article / guide is broken up into 3 parts. It is assumed you already have access to a Ubuntu Server, with Docker & Jellyfin installed and you're now ready to share Jellyfin with your friends and family.
- Part 1: Deploy NGINX Manager as a Container
- Part 2: Jellyfin Network & Reverse Proxy Configs
- Part 3: Deploy Tailscale as a Container with Tailscale ACLs
If you don't have Jellyfin, please go here to deploy it via Docker: https://jellyfin.org/docs/general/installation/container/
Part 1: Deploy NGINX Manager as a Container
Similar to Article 1, we're going to deploy NPM (Nginx Proxy Manager), NPM is a reverse proxy that is easy to use and is configurable enough for our use-case.
- Open up your local Terminal (command prompt.exe / terminal.app) and
sshinto your Ubuntu External Reverse Proxy Server, installdockerunless you have already done so. - Create a new directory using the command
cd ~/ && mkdir ~/nginx-proxy-manager && cd ~/nginx-proxy-manager - Create a new docker compose file with
nano compose.yaml- Copy the contents below, and paste it in
- Hit
ctrl+oto write to file, thenctrl+xto quit nano
services:
  app:
    image: 'docker.io/jc21/nginx-proxy-manager:latest'
    restart: unless-stopped
    ports:
      - '80:80'
      - '81:81'
      - '443:443'
    volumes:
      - ./data:/data
- ./letsencrypt:/etc/letsencrypt- Use
cat compose.yamlto validate the contents of the file we just made. It should look like the above - Use
docker compose up -dto start the containers up. Give it a minute and then in your browser, open up one of the following:- If you set-up NPM locally on your Mac/Windows/Linux, go to http://localhost:81/ in your web browser
- If you set-up NPM on another system, go to that IP address with :81 appended. Example: http://192.168.1.1:81/
- You should now see the start-page of
Nginx Proxy Manager. Using the following default credentials to sign in and set-up a new account.- User: admin
- Pass: changeme
You've set-up the base of NGINX Proxy Manager, lets configure NPM & Jellyfin for Reverse Proxy connections.
Part 2: Jellyfin Network & Reverse Proxy Configs
The following configurations only apply to Jellyfin but the principles apply to other apps you want to deploy in this scenario.
- Sign into your Jellyfin instance with an account with admin access
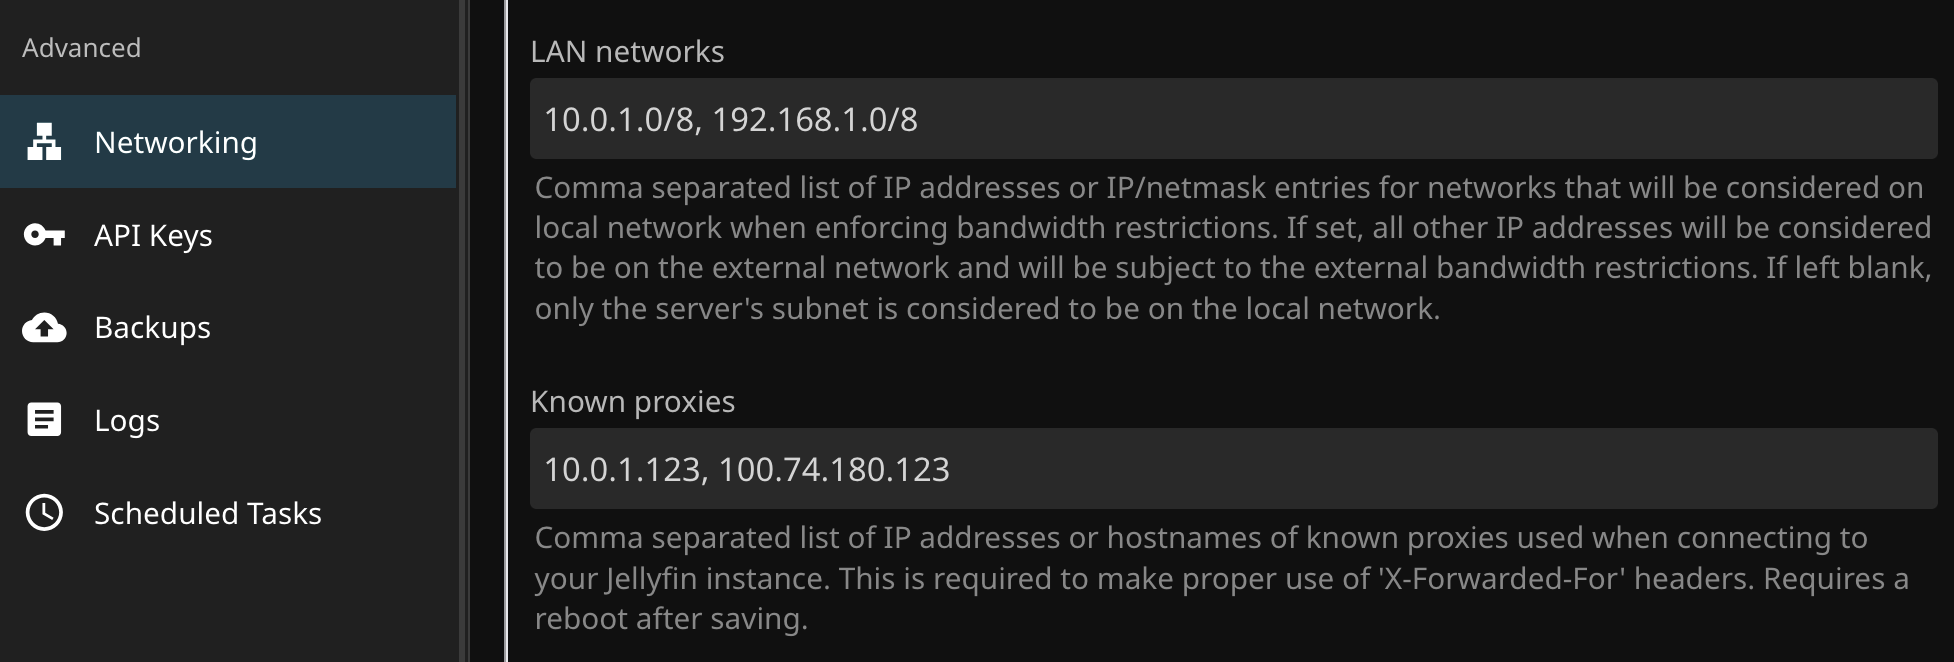
- Navigate to "Dashboard > Advanced > Networking"
- Locate LAN networks and Known proxies
- Enter your respective information for your local networks into LAN Networks and your Nginx Proxy Manager IP addresses
- LAN Networks: Add the subnet mask, if you're not sure what that is, add a /8 to your local network address
- Known Proxies: Add the IP address of your NPM server's IP, here I also have the Tailscale IP which we will get later in this guide
- Sign into your
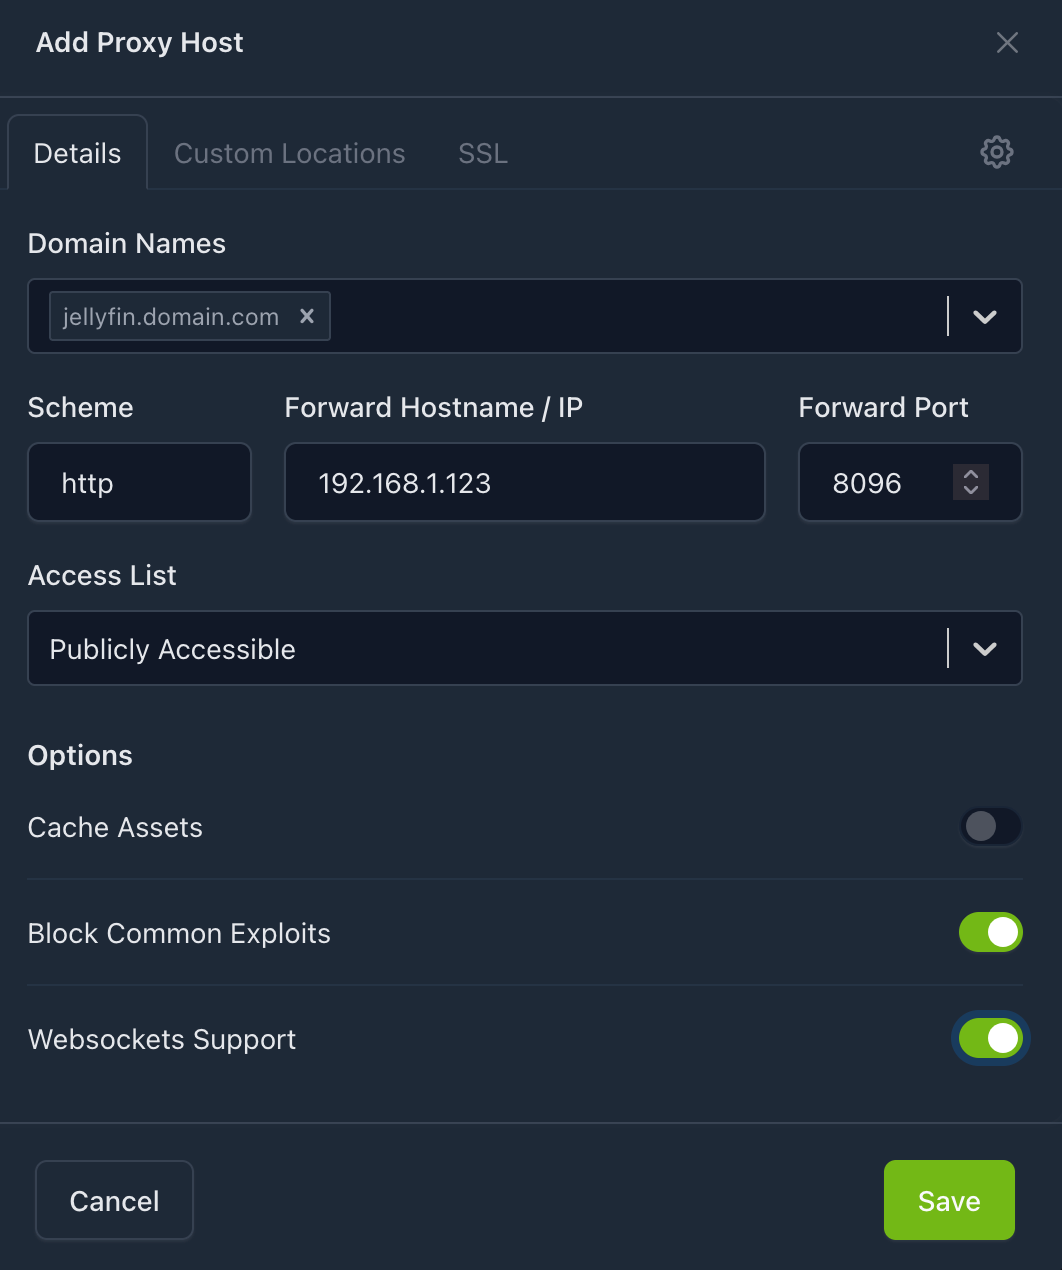
Nginx Proxy Managerconsole (e.g. 192.168.1.123:81) - Select 'Add Host'
- Enter in the local network details of your Jellyfin host under details:
- Domain Names: jellyfin.domain.com (use the domain you have set-up)
- Scheme: http
- Forward hostname / IP: 192.168.1.123 (*jellyfin local IP address)
- Forward Port: 8096
- Block Common Exploits: Checked
- Websockets Support: Checked
- Select the 'SSL' tab and edit the following:
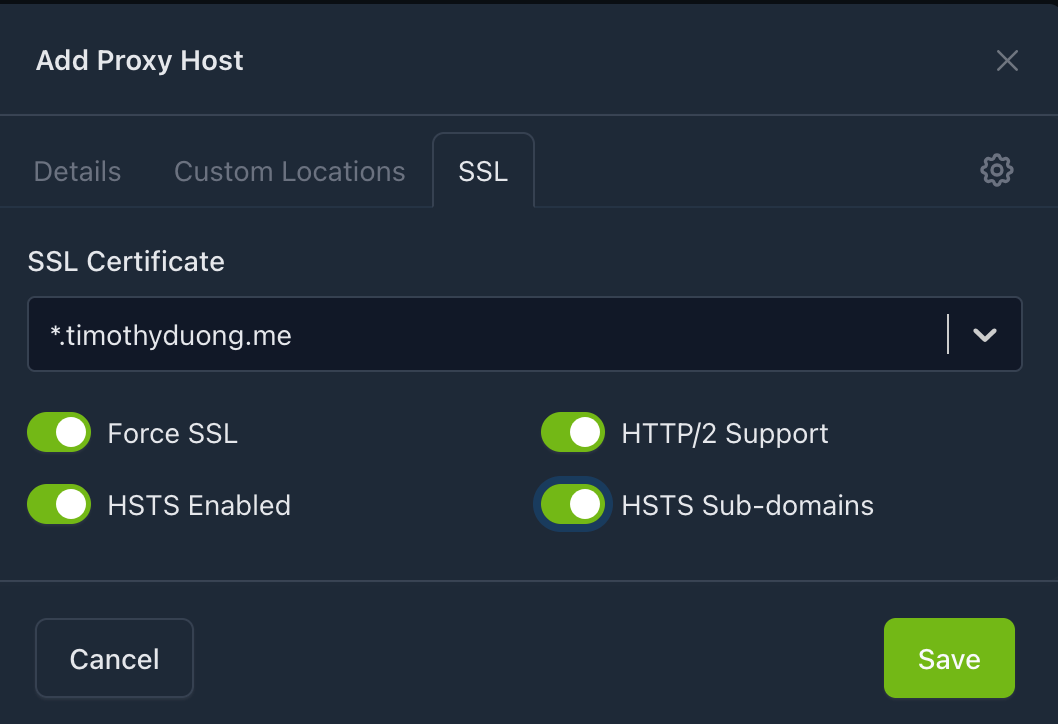
- Select the Settings Cog in the top right hand corner of the Add Proxy Host window and then add the following nginx config information.
Make sure to change the internalip to your internal ip address of your Jellyfin Server location / {
# Proxy main Jellyfin traffic
proxy_pass http://internalip:8096;
proxy_set_header Host $host;
proxy_set_header X-Real-IP $remote_addr;
proxy_set_header X-Forwarded-For $proxy_add_x_forwarded_for;
proxy_set_header X-Forwarded-Proto $scheme;
proxy_set_header X-Forwarded-Protocol $scheme;
proxy_set_header X-Forwarded-Host $http_host;
# Disable buffering when the nginx proxy gets very resource heavy upon #treaming
proxy_buffering off;
}
location /embywebsocket {
# Proxy Jellyfin Websockets traffic
proxy_pass http://internalip:8096;
proxy_http_version 1.1;
proxy_set_header Upgrade $http_upgrade;
proxy_set_header Connection "upgrade";
proxy_set_header Host $host;
proxy_set_header X-Real-IP $remote_addr;
proxy_set_header X-Forwarded-For $proxy_add_x_forwarded_for;
proxy_set_header X-Forwarded-Proto $scheme;
proxy_set_header X-Forwarded-Protocol $scheme;
proxy_set_header X-Forwarded-Host $http_host;
}The NGINX code block for jellyfin to serve traffic over websockets
- Select 'Save' to save the Proxy Host configuration
- You can now test it by going to the new URL, it should load the Jellyfin page without any issues!
🛑 Caution: Local DNS record recommended 🛑
It is recommended to add a local DNS entries to ensure you route locally. E.g. a CNAME & A Record for Jellyfin and your Reverse Proxy respectively. Otherwise you will either go directly to the Jellyfin IP:Port or route via Tailscale all the time
Go to Part 3 in this guide: https://blog.timothyduong.me/self-hosting-partone-publishing-locally/ otherwise, please carry on
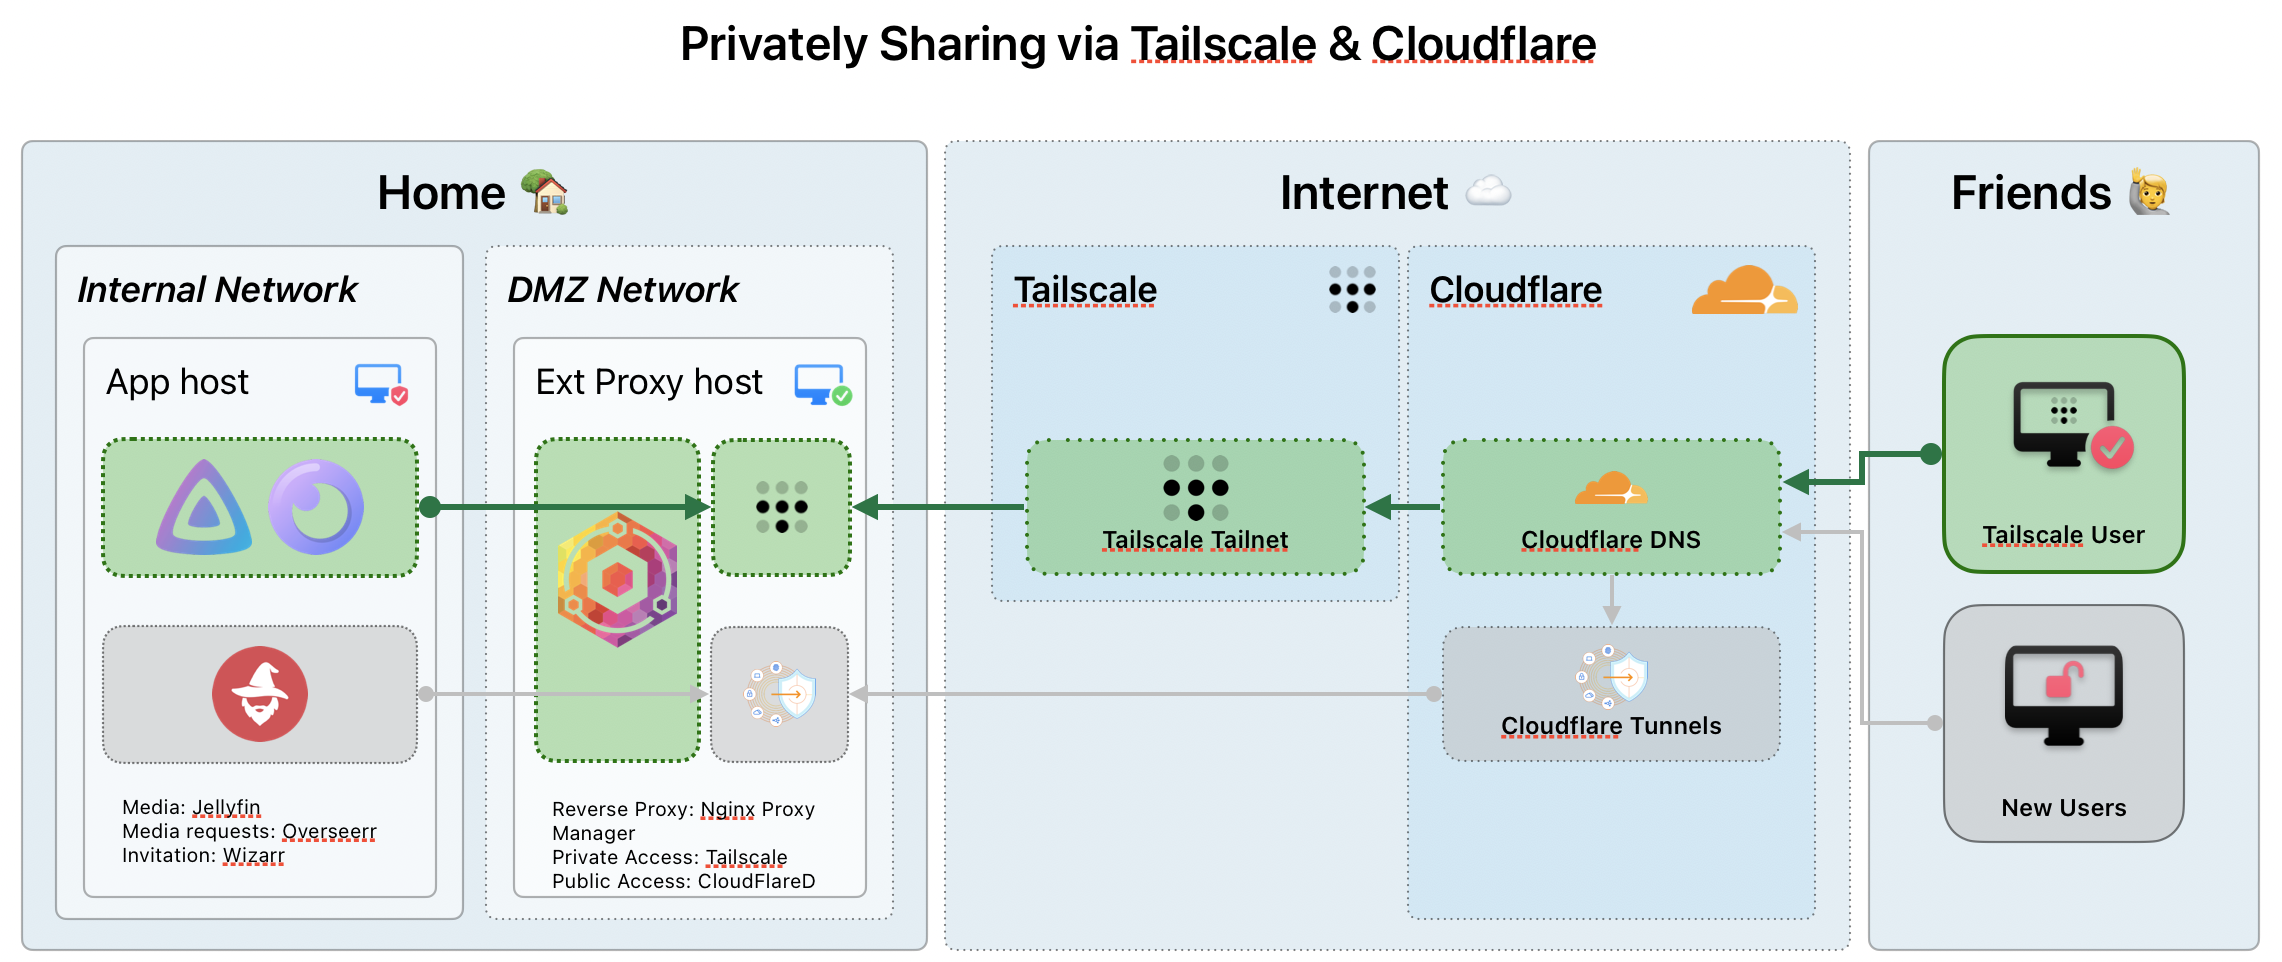
Part 3: Deploying Tailscale as a Container with ACLs
Here we will be deploying Tailscale as a Container, why a container? So I can migrate the container & configuration between machines if I need to stand it up. If I install Tailscale binary, it would enable the Tailnet onto my Host machine (e.g. ssh access) but I don't want that and only want to share the HTTP/HTTPS network access to this box.
In my deployment, I also have a separate Ubuntu server set-up and it is sitting in my 'DMZ' network. I have it set-up like this as I'm sharing with other people access to my external reverse proxy rather than my internal reverse proxy or the services directly. That way, I can add additional controls, policies and segment the users easily.
- Login or Sign-up for Tailscale: https://login.tailscale.com/
- Once signed in, navigate to 'Tags': https://login.tailscale.com/admin/acls/visual/tags
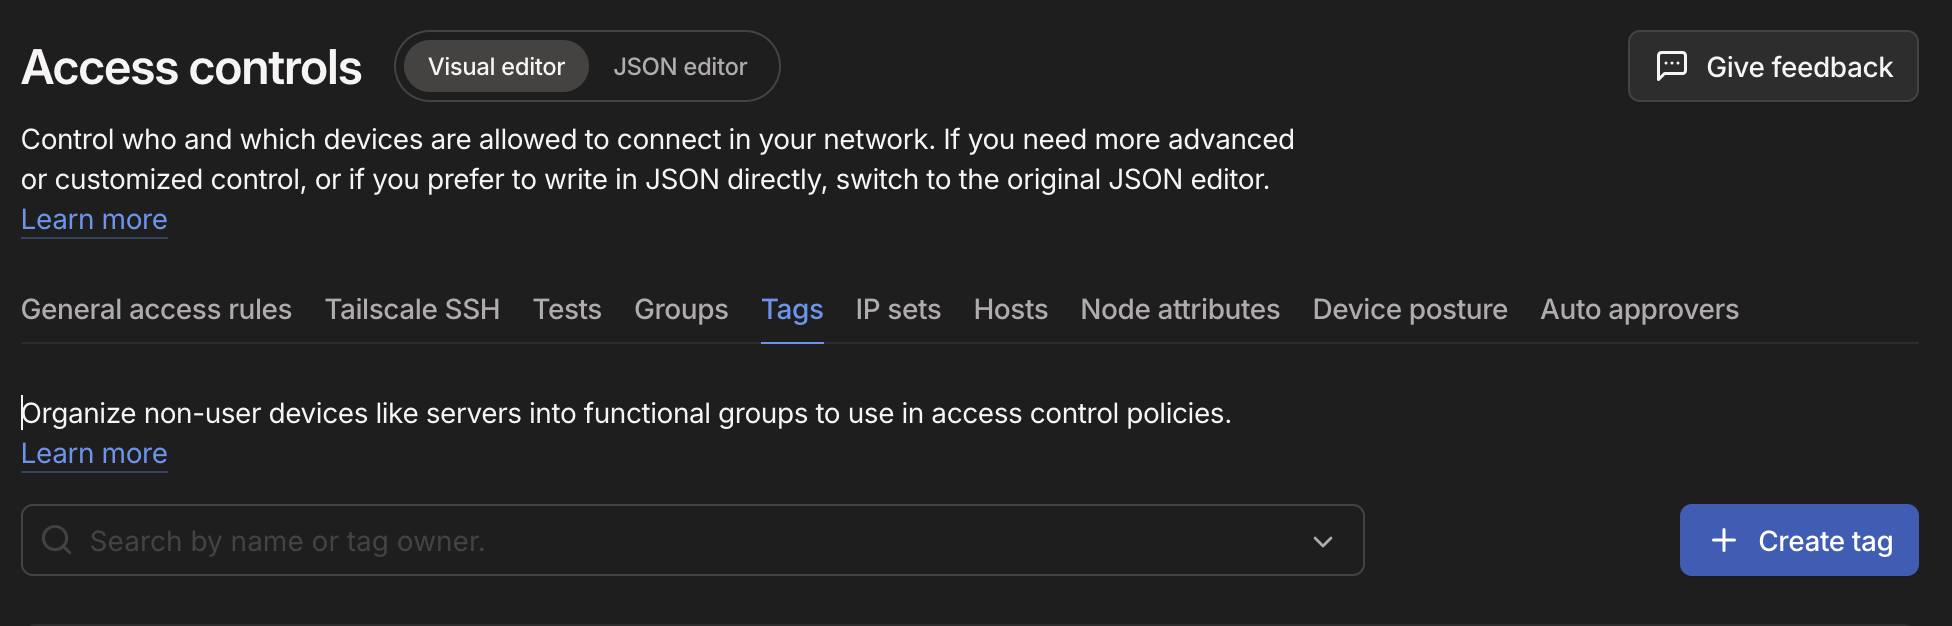
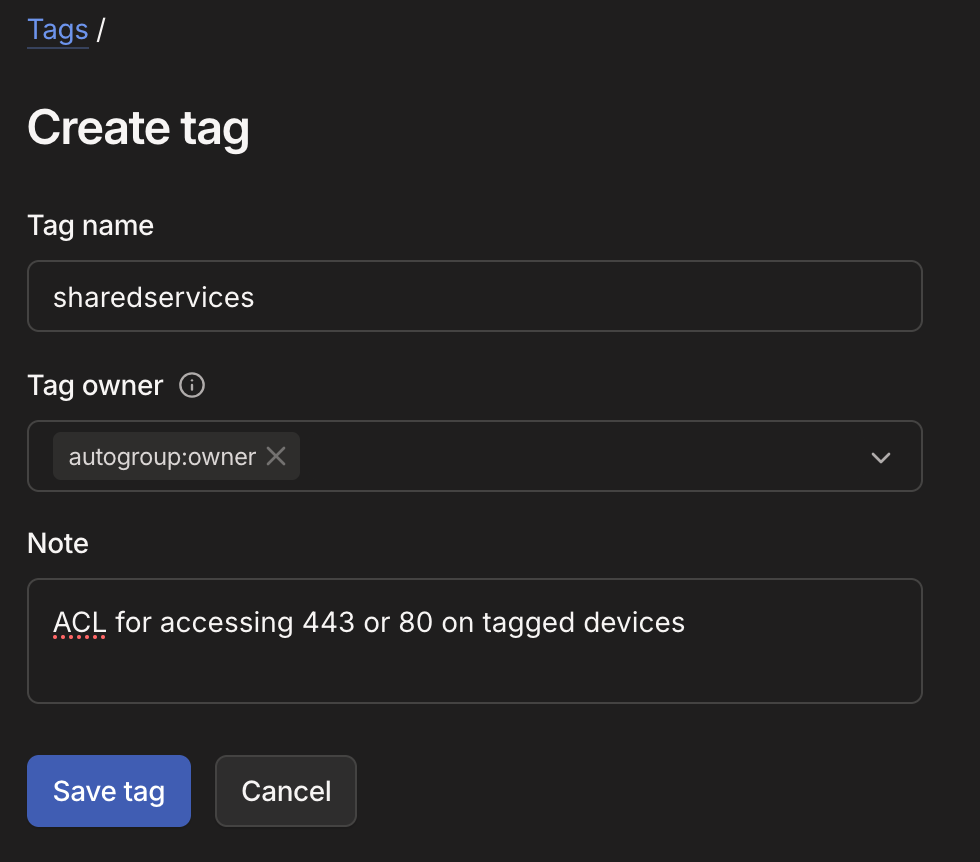
- Select 'Create Tag' and fill out the tag details:
- Tag name:
sharedorsharedservices - Tag Owner:
autogroup:owner - Note: Add meaningful notes to help remind yourself later what it does
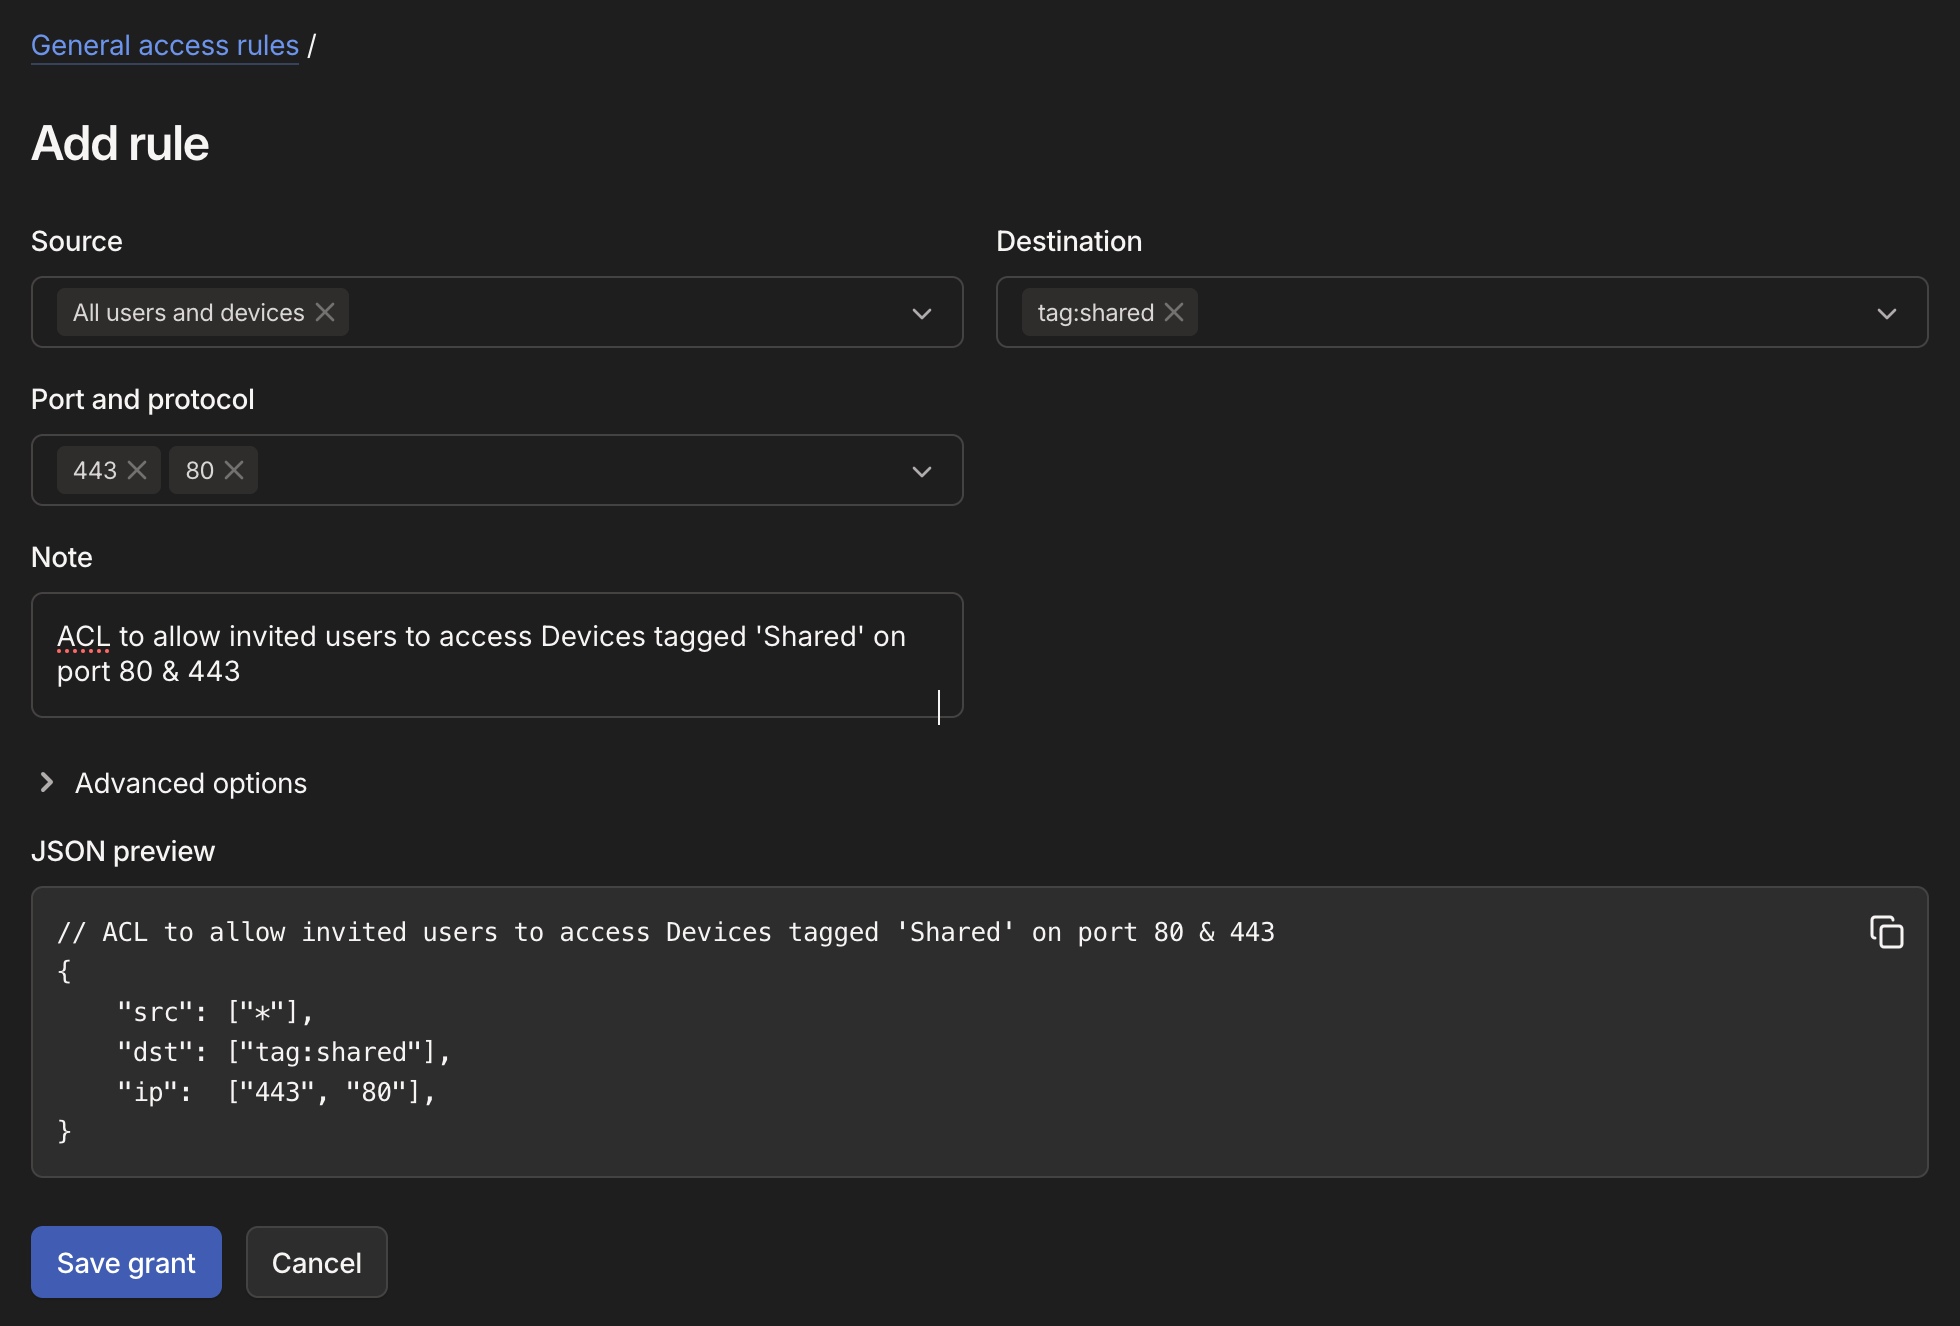
- Select 'Save tag' then navigate to 'General Access Rules' and '+ Add Rule'
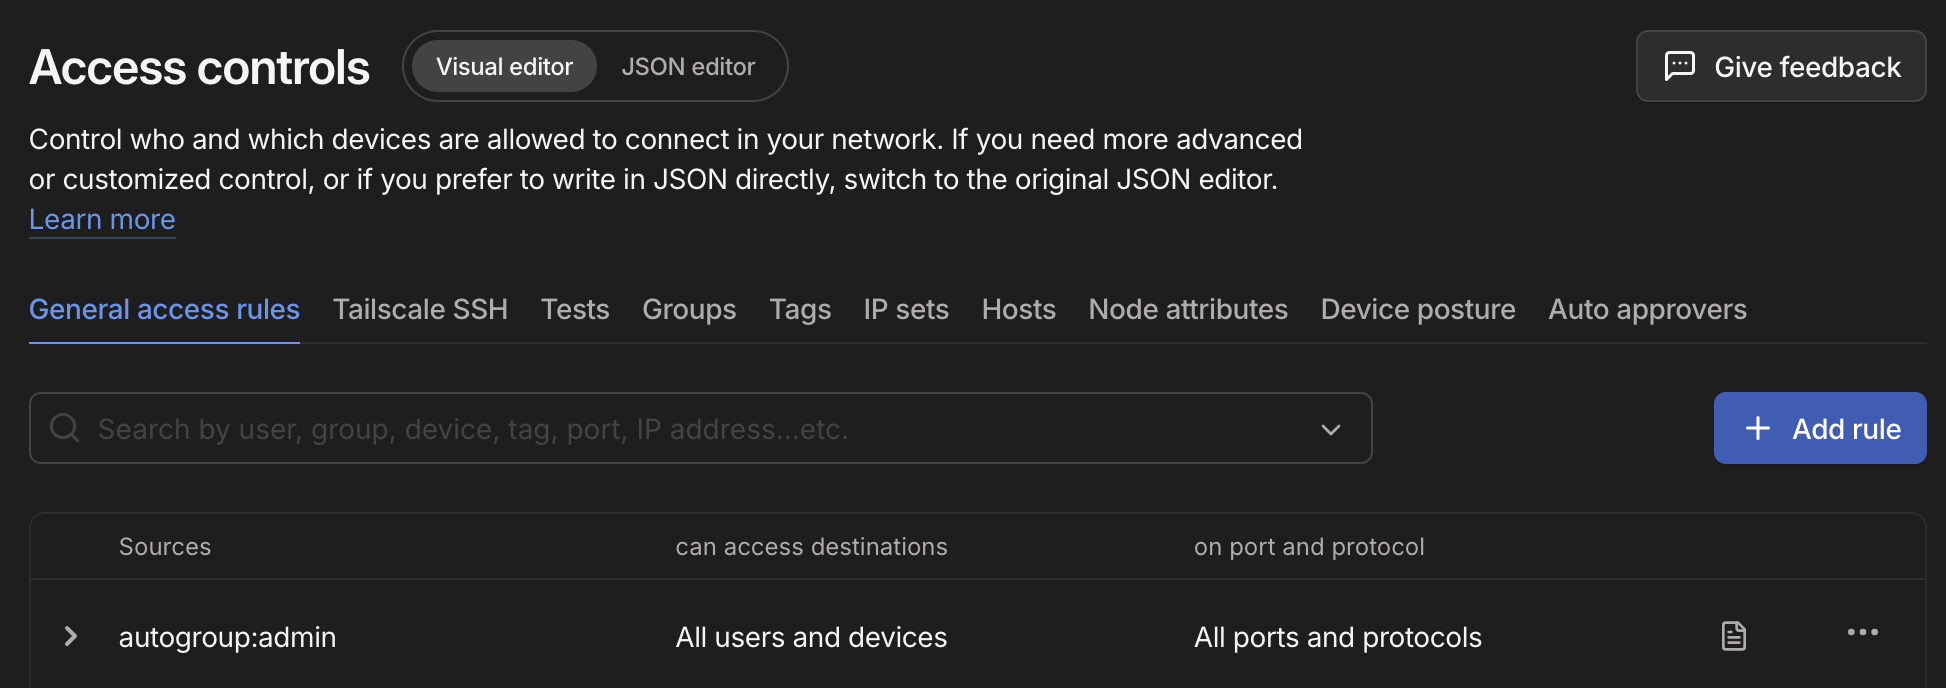
- Fill out the rules as required and hit 'Save Grant'
- Source: All users & devices (*)
- Destination:
tag:shared - Port & Protocol:
44380 - Note: ACL to allow invited users to access Devices tagged 'Shared' on port 80 & 443
- Navigate to the Admin Portal and to 'Settings > Keys': https://login.tailscale.com/admin/settings/keys
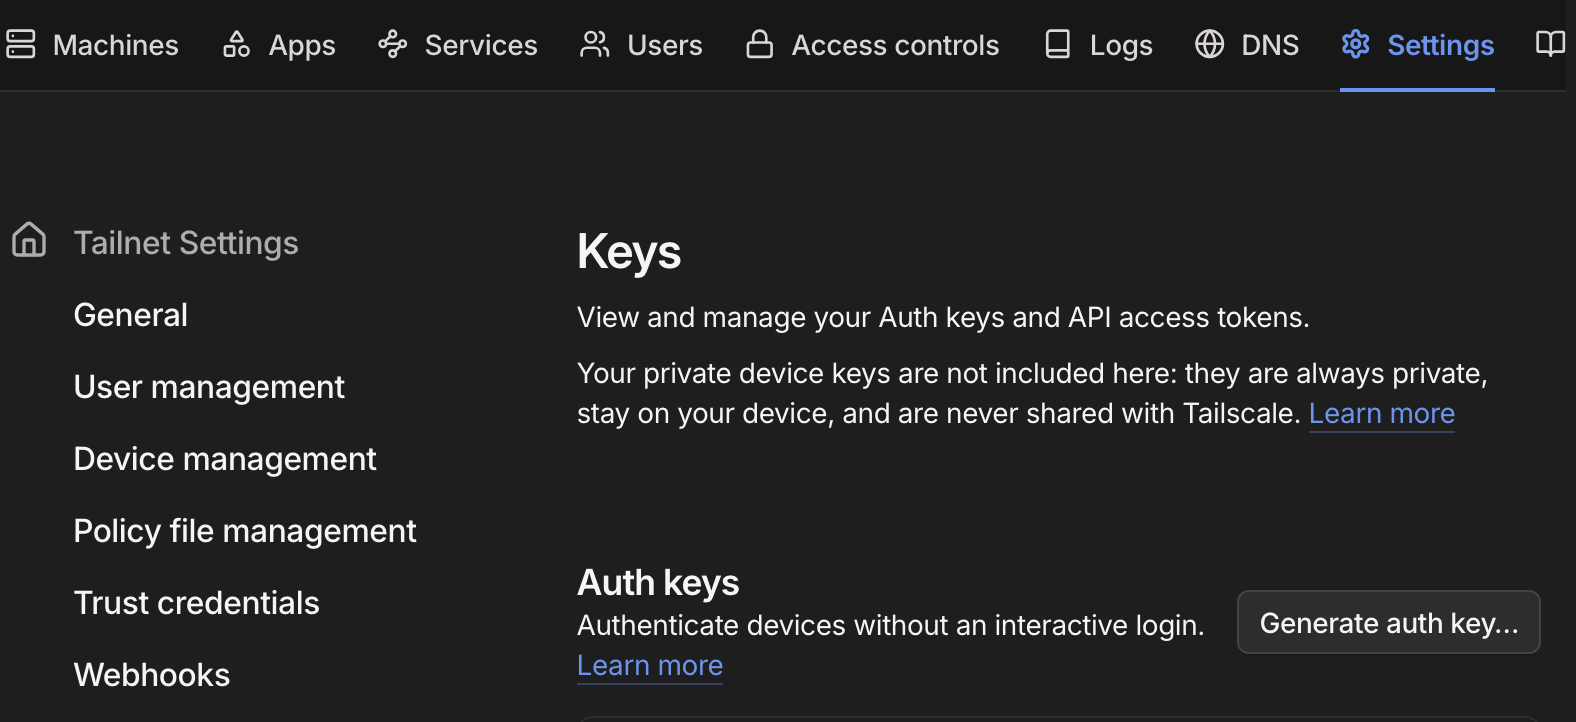
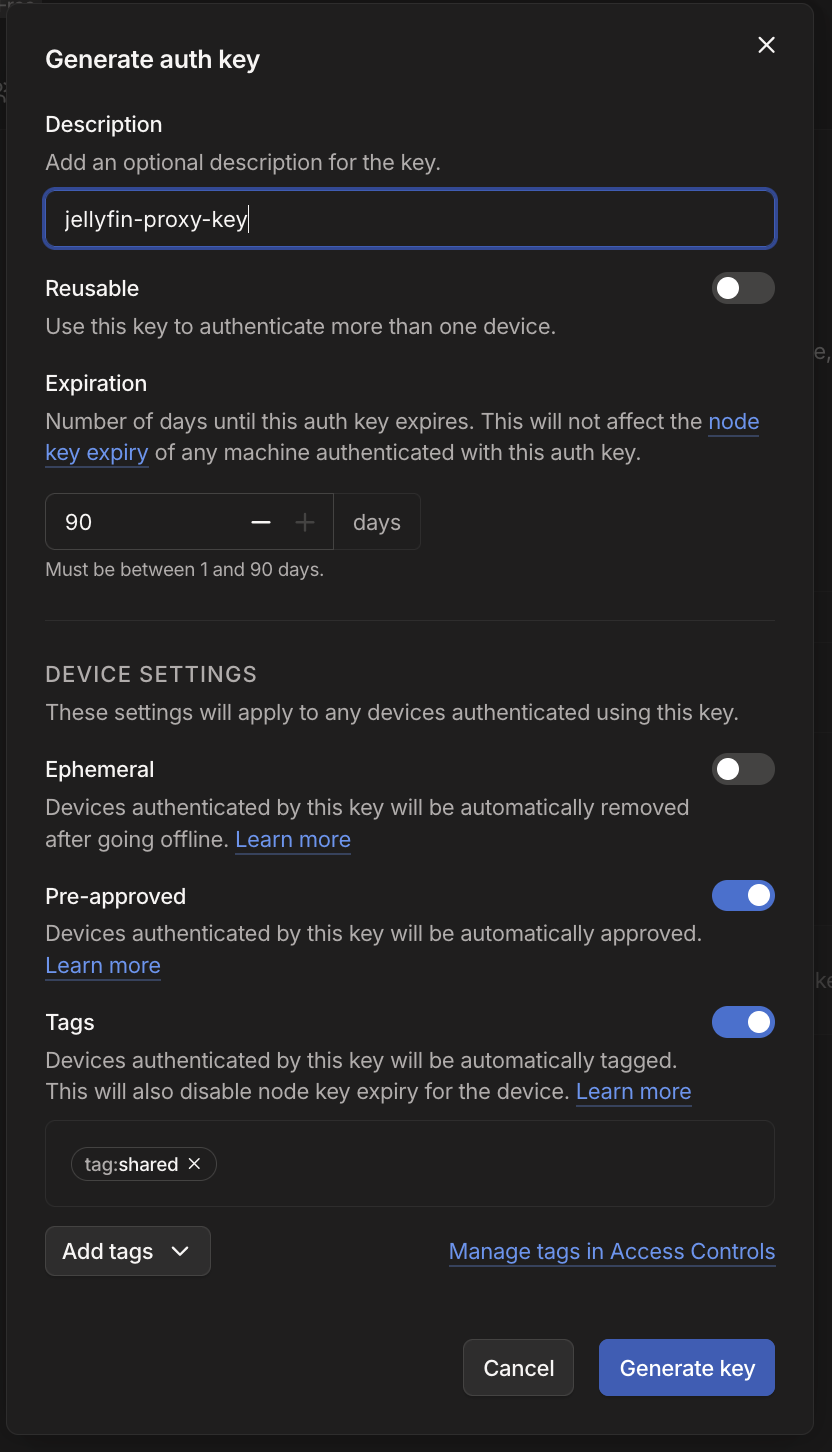
- Select 'Generate auth key' and Enable the following settings:
- Description: jellyfin-proxy-key (enter whatever you feel fits)
- Reusable: No (Recommend it to be no)
- Pre-approved: Yes
- Tags:
tag:shared
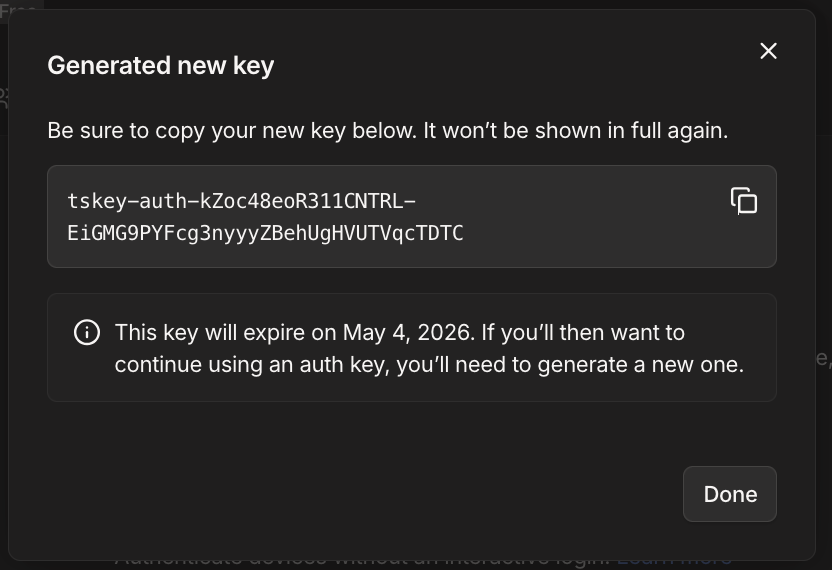
- Select 'Generate Key' and copy the whole key e.g.
tskey-auth-the-rest-of-the-key
- SSH into your Proxy Server
- Create a new directory for Tailscale using
cd ~/ && mkdir tailscale && cd tailscale - Create the Tailscale docker compose.yaml
nano compose.yaml - Enter the following into the
compose.yaml
services:
  tailscale:
    image: tailscale/tailscale
    hostname: jellyfin-tailscale
    cap_add:
      - NET_ADMIN
      - NET_RAW
    environment:
      - TS_AUTHKEY=tskey-auth-the-rest-of-the-key
      - TS_SOCKET=/var/run/tailscale/tailscaled.sock
      - TS_EXTRA_ARGS=--accept-routes
      - TS_STATE_DIR=/var/lib/tailscale
    volumes:
      - ./data:/var/lib # Creates a tailscale directory under /data for persistence
      - /dev/net/tun:/dev/net/tun
    network_mode: host
    restart: unless-stopped
networks: {}
replace 'tskey-auth-the-rest-of-the-key' with the real key you copied from Tailscale
- Run the following to spin up the container
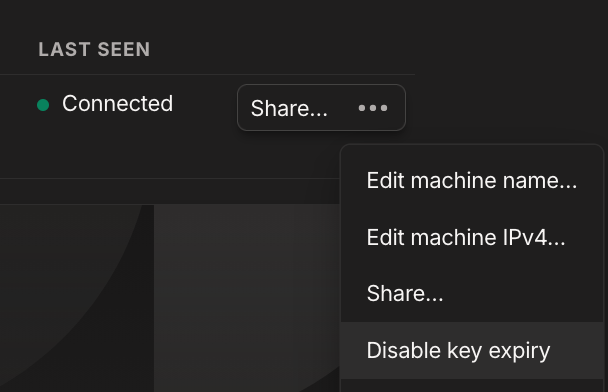
sudo docker compose pull && sudo docker compose up -d - Check your Tailscale Admin Console > Machines
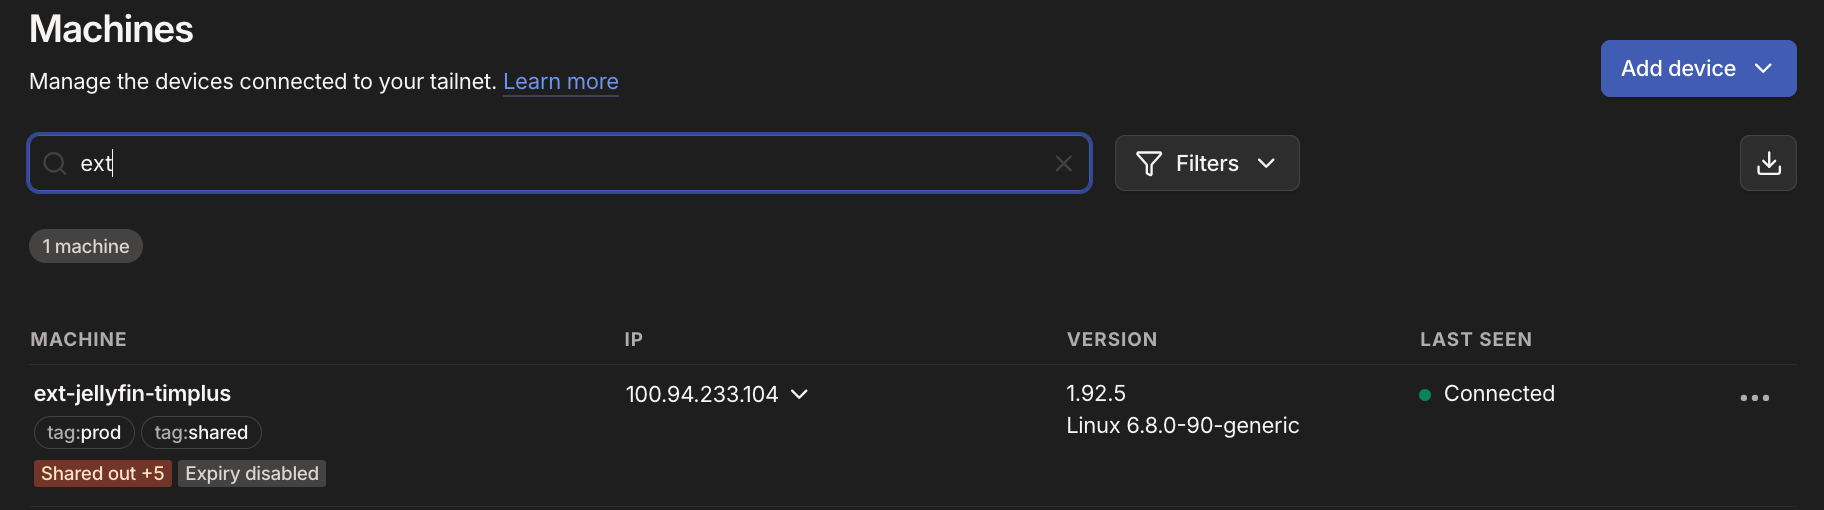
- Select the three dots '...' and select 'Disable Key Expiry' to remove the need to re-authenticate the server / container every 90 days, otherwise, users will lose access
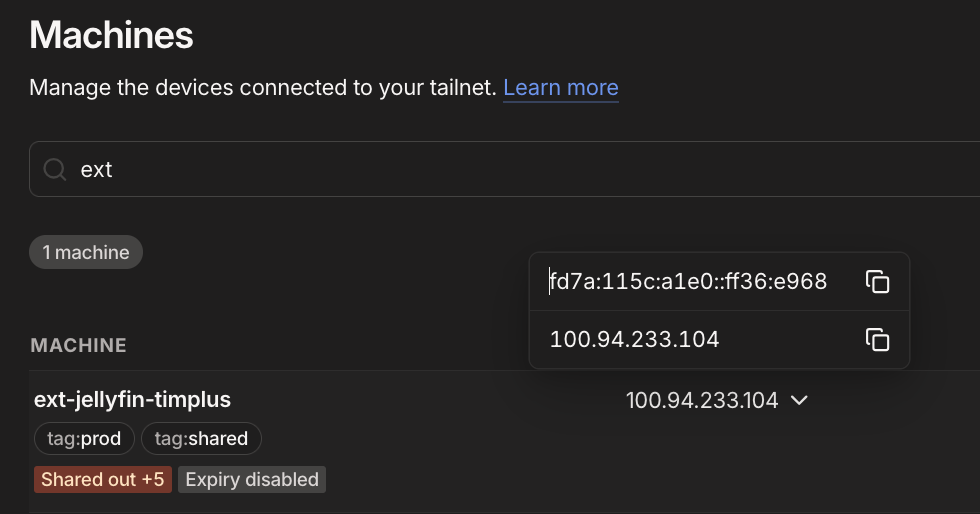
- We will now need to add the
Tailscale IPand associate it with your External DNS provider / Cloudflare DNS, this is optional but recommended. Locate the machine and under IP address to copy it to clipboard.
- Load up Cloudflare DNS and create a new DNS A record:
- Record Name: ext-proxy
- Type: A
- Content: the tailscale IP address. e.g., 100.76.150.8
- Then create a new DNS CNAME Record:
- Record Name: jellyfin
- Type: CNAME
- Content: ext-proxy.domain.com

These 2 records will ensure that users will hit the private Tailscale IP address when accessing from the internet / publically. They will need to have tailscale enabled and also be invited to your tailnet
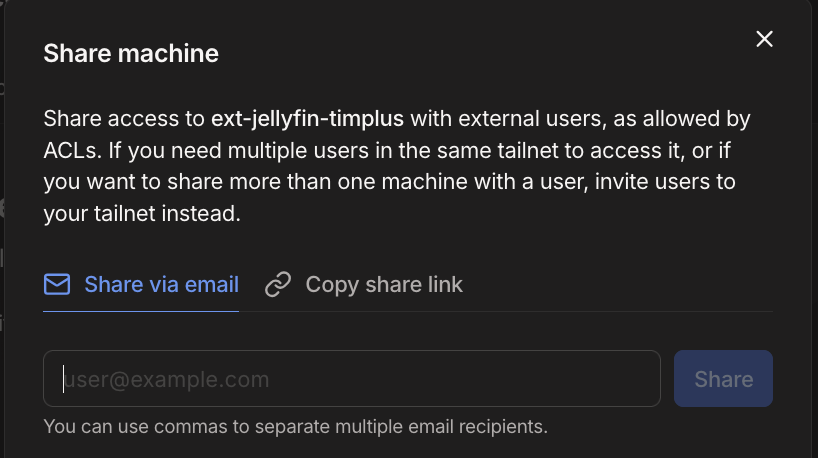
- Your network stack should be ready now, and all you need to do is share your Machine
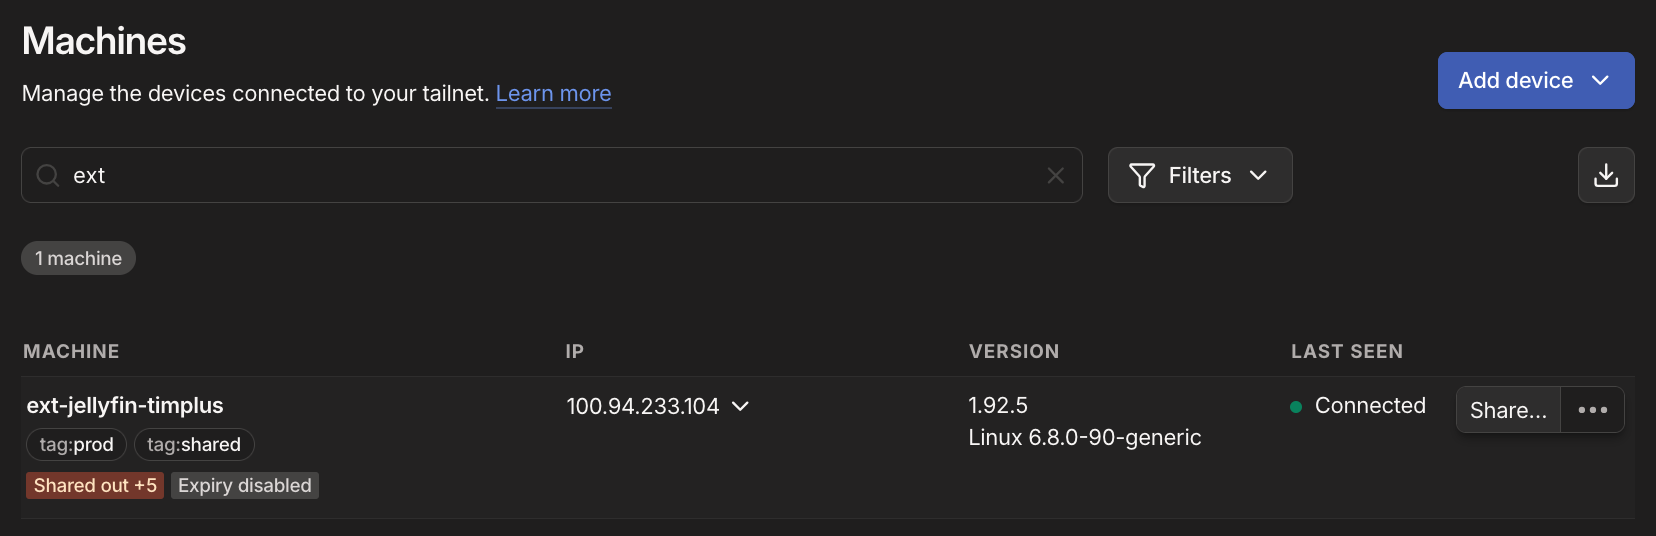
- From Tailscale, locate the Machine, on the right hand side is the dots
..., select 'Share'- Select 'Share via email' and add the email you'd like to share this machine with
- Once a person connects, you may need to manually approve them from the Tailscale Admin Console
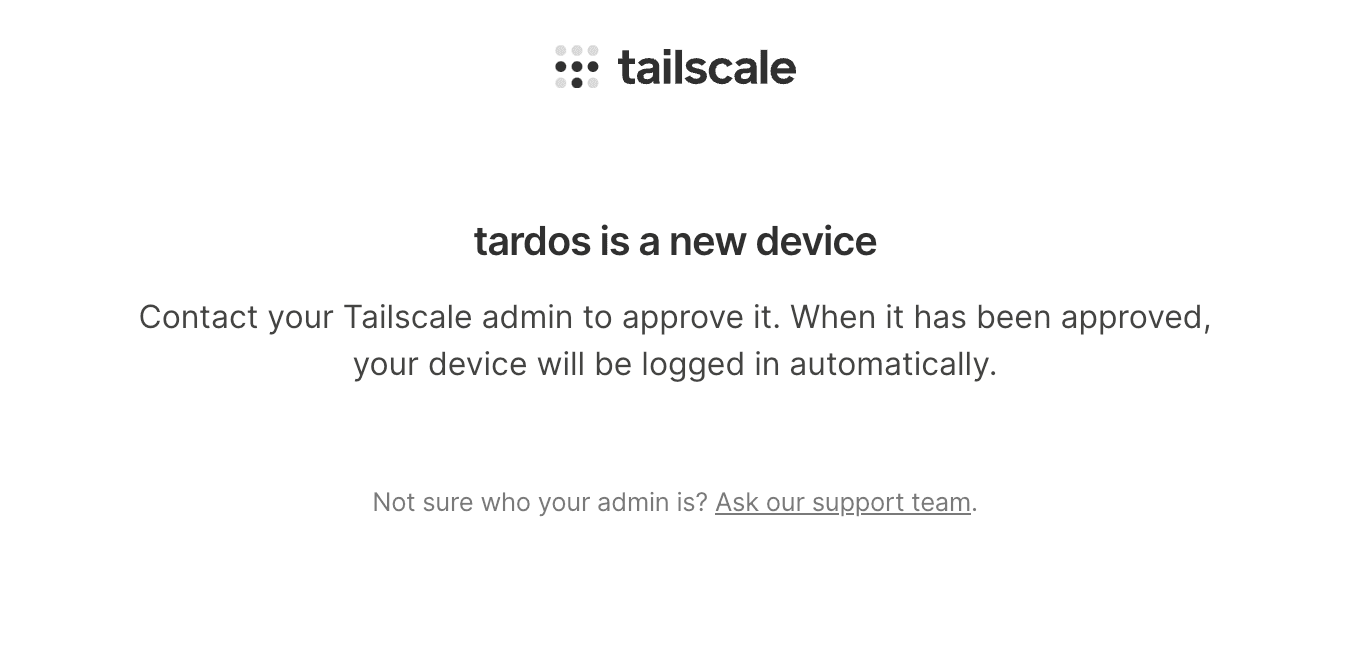
- Once they're approved, they should be able to access your Jellyfin server if they have installed Tailscale and have it connected.
Phew, we're done! We can test it externally by turning off Wi-Fi from your mobile device, turning on Tailscale and attempting to access Jellyfin.
- If we enable Tailscale & disable Wi-Fi, Jellyfin should load
- If we disable Tailscale & Wi-Fi, Jellyfin should not load
- If we enable Wi-Fi & Tailscale, Jellyfin should load
Optional Appendices
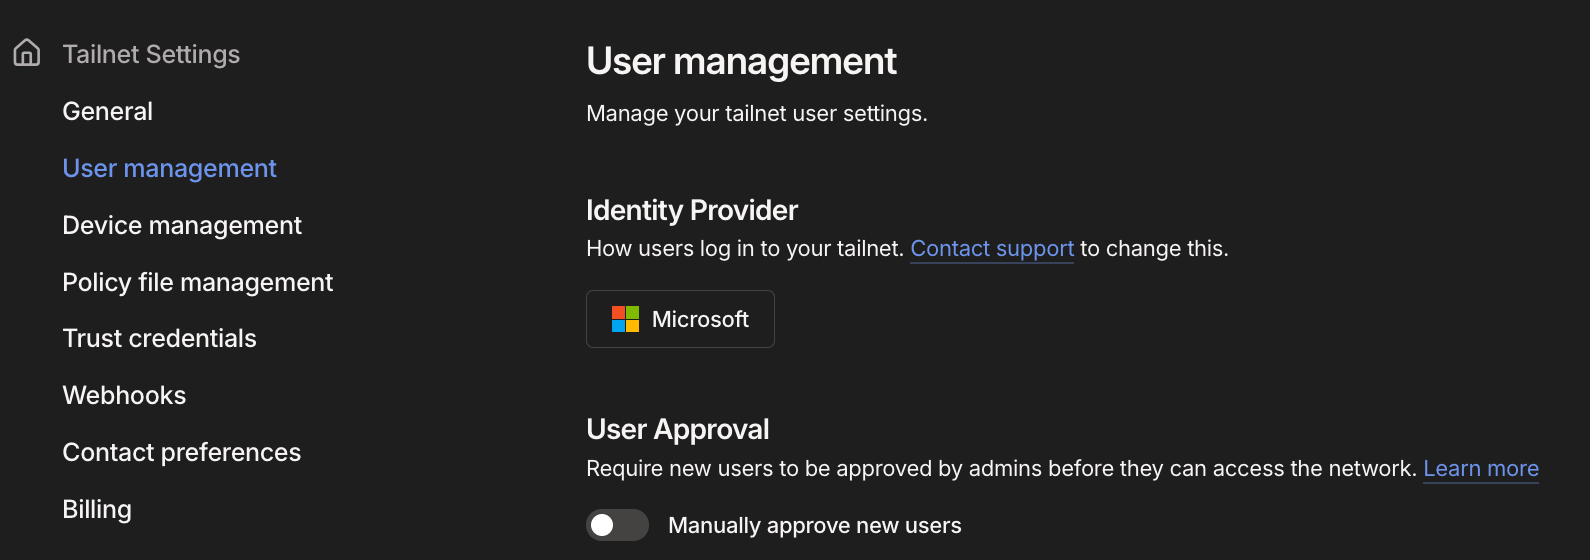
Tailscale - Enabling Auto-approve ✅
- You can enable auto-approve in the Settings > User Management > User Approval:
Jellyfin & Tailscale on TV Devices 📺
Yes, you can have your private network accessible by yourself/others as long as their devices can install Tailscale.
- Android TV: https://tailscale.com/docs/install/android
- Apple TV: https://tailscale.com/docs/install/appletv
Once installed alongside the Jellyfin TV apps, they can watch Jellyfin using the native players.
Conclusion
We walked through a way for end users to securely access your Jellyfin app privately over the internet without exposing it to other randoms (the public) and set-up the following:
- Nginx Proxy Manager, to create a reverse proxy to serve the application(s) over HTTPS/443
- Tailscale, to enable private access for selected users that you have invited
- Tailscale ACLs, to ensure those invited users can only access what you let them access
- External DNS records to allow people from outside your network to access via Tailscale
Questions, alternatives & improvements
- Why not place Tailscale on the host directly (Binary)? I want to be able to back-up and restore my device easily without having to re-invite people to the machine.
- Why not invite people to the Tailnet and not the machine?
- Why not caddy / traefik? Caddy & traefik and even pangolin are way more robust and powerful tools, but they come with learning curves. If you know about those tools, the more power to you!
- Why not PLEX/Emby instead of Jellyfin? I just like Jellyfin, you definitely can use Plex or Emby instead. This guide is mainly to teach the principals.
- Why not netbird or headscale instead of Tailscale? Tailscale has popular auth 'SSO' providers enabled. If you know what that means, then this article is not for you!
- What are some better alternatives?
- Media Server / Jellyfin: Plex, Emby
- Reverse Proxy / Nginx Proxy Manager: Nginx, NPM-plus, Pangolin, Traefik, Caddy
- Private Network / Tailscale: Netbird, Pangolin, Tailscale+Headscale
- External DNS / Cloudflare DNS: I prefer Cloudflare DNS cause there's less steps for Cloudflare Tunnel but Route53 works well too.
Final Part 4
The final article (Part 4) will use another tool called 'Wizarr' in a hybrid deployment that streamlines user-onboarding processes to Tailscale & Jellyfin and combines all the learnings from Articles 1, 2, & 3.
Other articles are:


Member discussion