
Self-hosting: Serving Locally - To Publish or Not to Publish, that is the Question

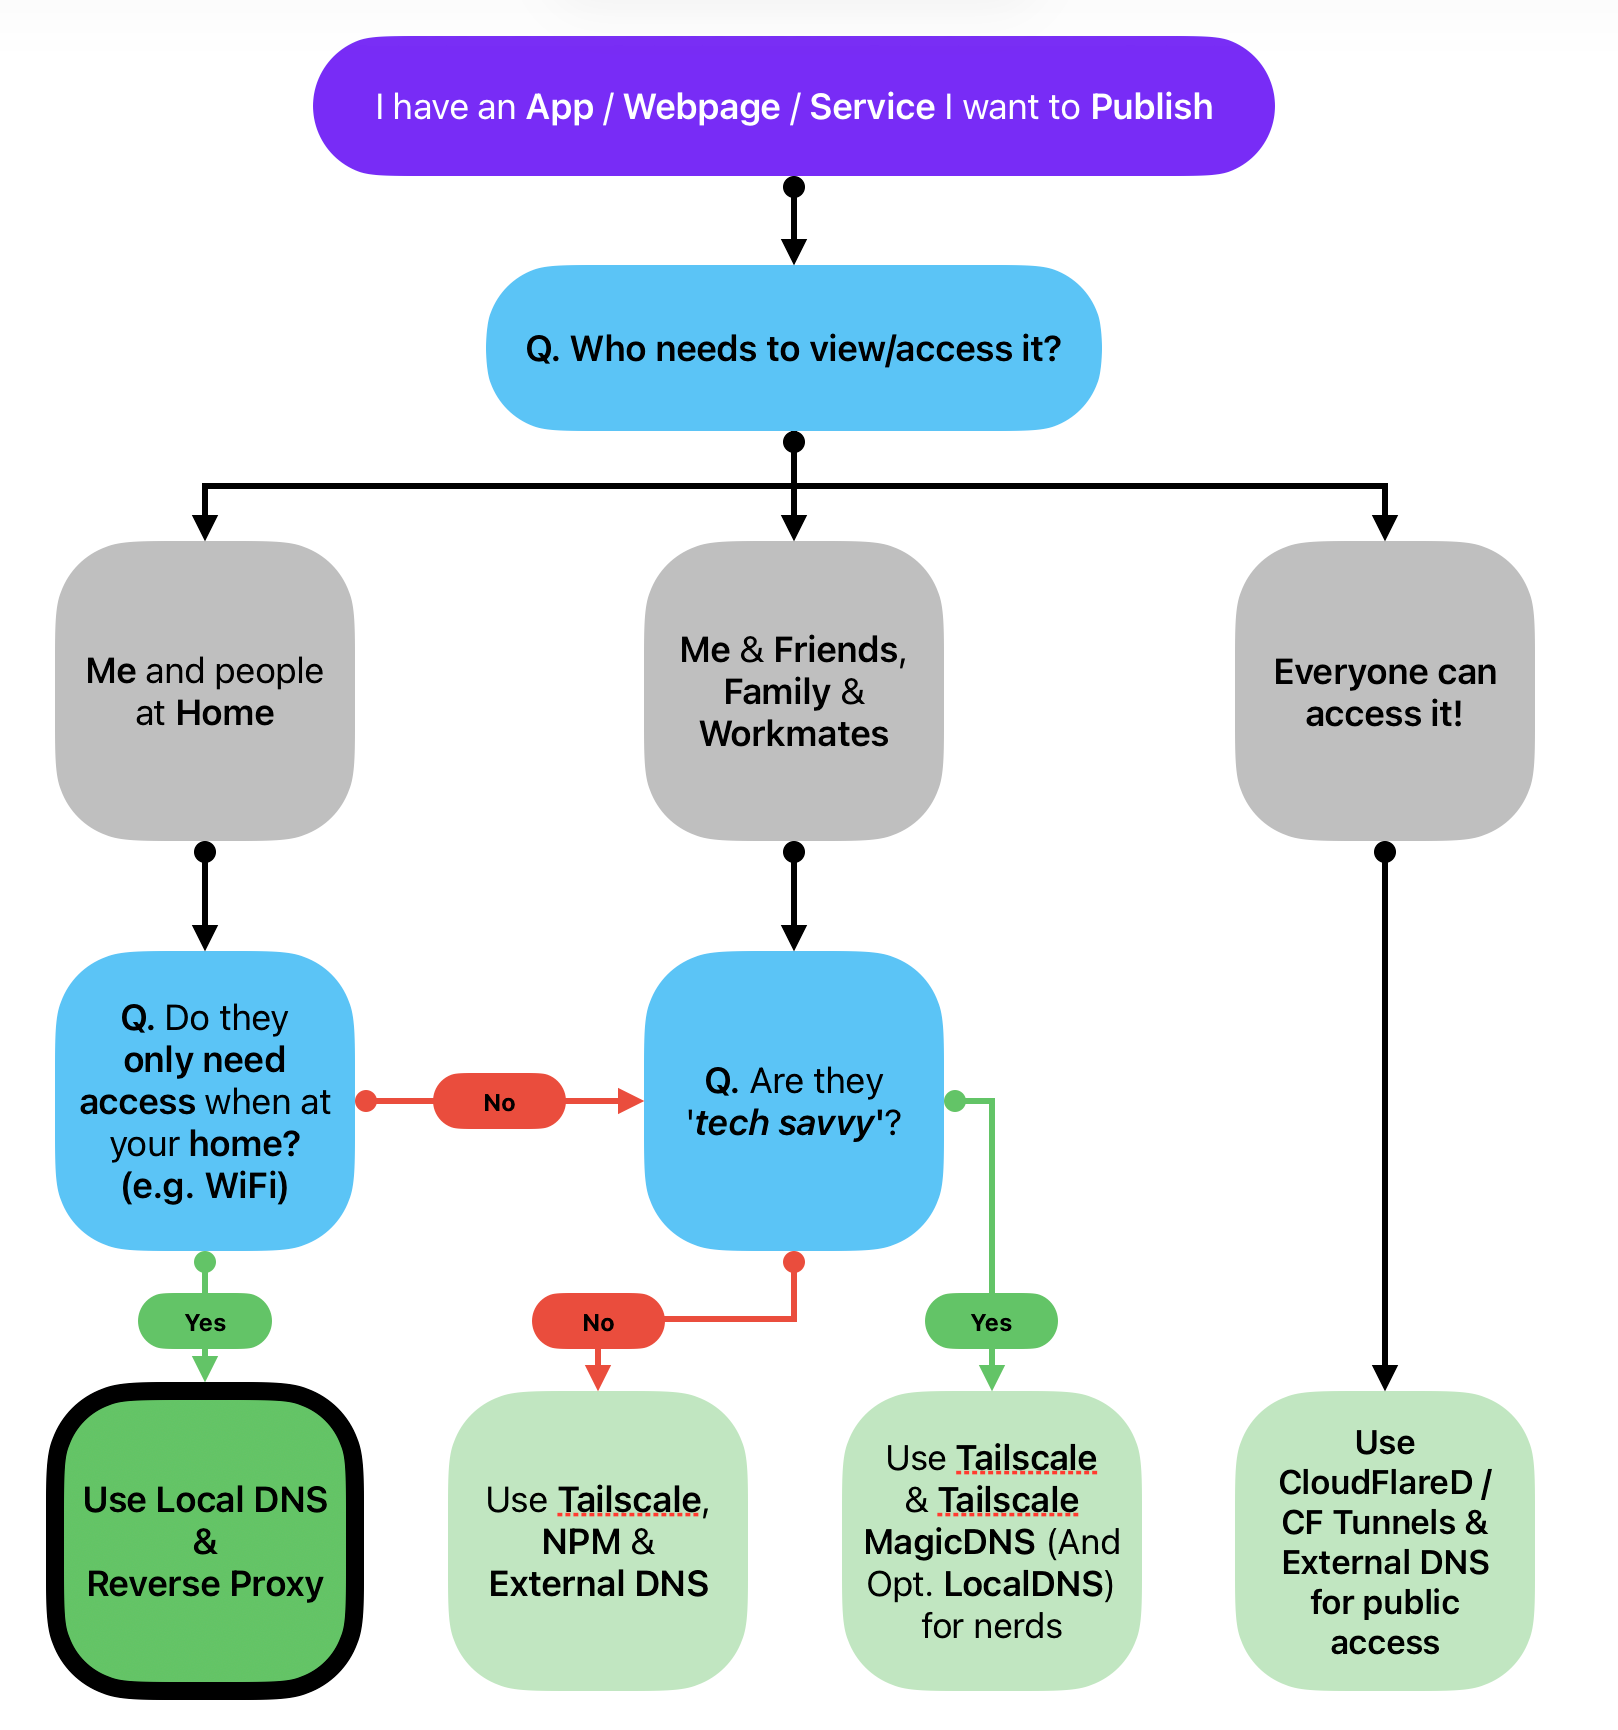
Are you new to self-hosting apps? You want to learn how a reverse proxy works? You want to publish an app from a docker container? You want to learn how CloudFlare Tunnels works? This next few articles are for you, this is the first article of 4 articles, each will be a self-contained step through to achieve a different scenario. Refer to the first diagram to see which scenario suits you.
Why am I posting this? I have seen time and time again people posting on r/homelab and r/selfhosted on how they should 'publish' an app, whether it is so they can access it away from home, to share with friends, or to have a public webpage/app (like this one!) A lot of people still ask 'How do I port forward safely?' or 'How do I stop IP addresses from country X from accessing my systems?' But of course those of us who start the self-host journey need to start somewhere, and in 2025 there's so many options more than ever.
Lets have a look at the diagram below, you're in the starting purple box, you've deployed an app at home, whether it is on your computer or raspberry pi, it's sitting there and you either access it via 192.168.1.X:portnumber (like http://192.168.1.1:8080) and now, you want to achieve some level of access for you and/or your family/friends.
Well, for starters, anyone on your home network (Wi-Fi or ethernet) can just use that IP Address link and get access to it no issue. But that isn't that user friendly, especially if it's not port 80/443 (http/https) then they'll need to bookmark it for future keeping. You could do that... or you could make it friendlier and appealing for the people that you hope to consume these app(s).
The thing is that if you only have 1 app or IP address to remember (probably the local router right? 192.168.1.1?) then it is all gravy. But when you start diving into containerisation and/or have multiple machines doing different things, you'll end up with multiple different IP address and port combinations. At this stage, you might as well leverage 'just one more container' and some additional settings on your local router and maybe some external services depending on how flexible you want your services to be.
How to publish / enable Access to your app via a Reverse Proxy and Local DNS.
A reverse what? Think of the internet like a food court. If you want something, you will need to stand up and go to that shop (website) to request food (content).
A 'reverse proxy' is like a waiter that serves you what you're asking for without you needing to go to the shop (website).
And Local DNS? DNS = Domain Name Service. It turns names to numbers (ip addresses). Continuing with analogies, IP addresses are numbers on food court building #'s, DNS is the store front branding.
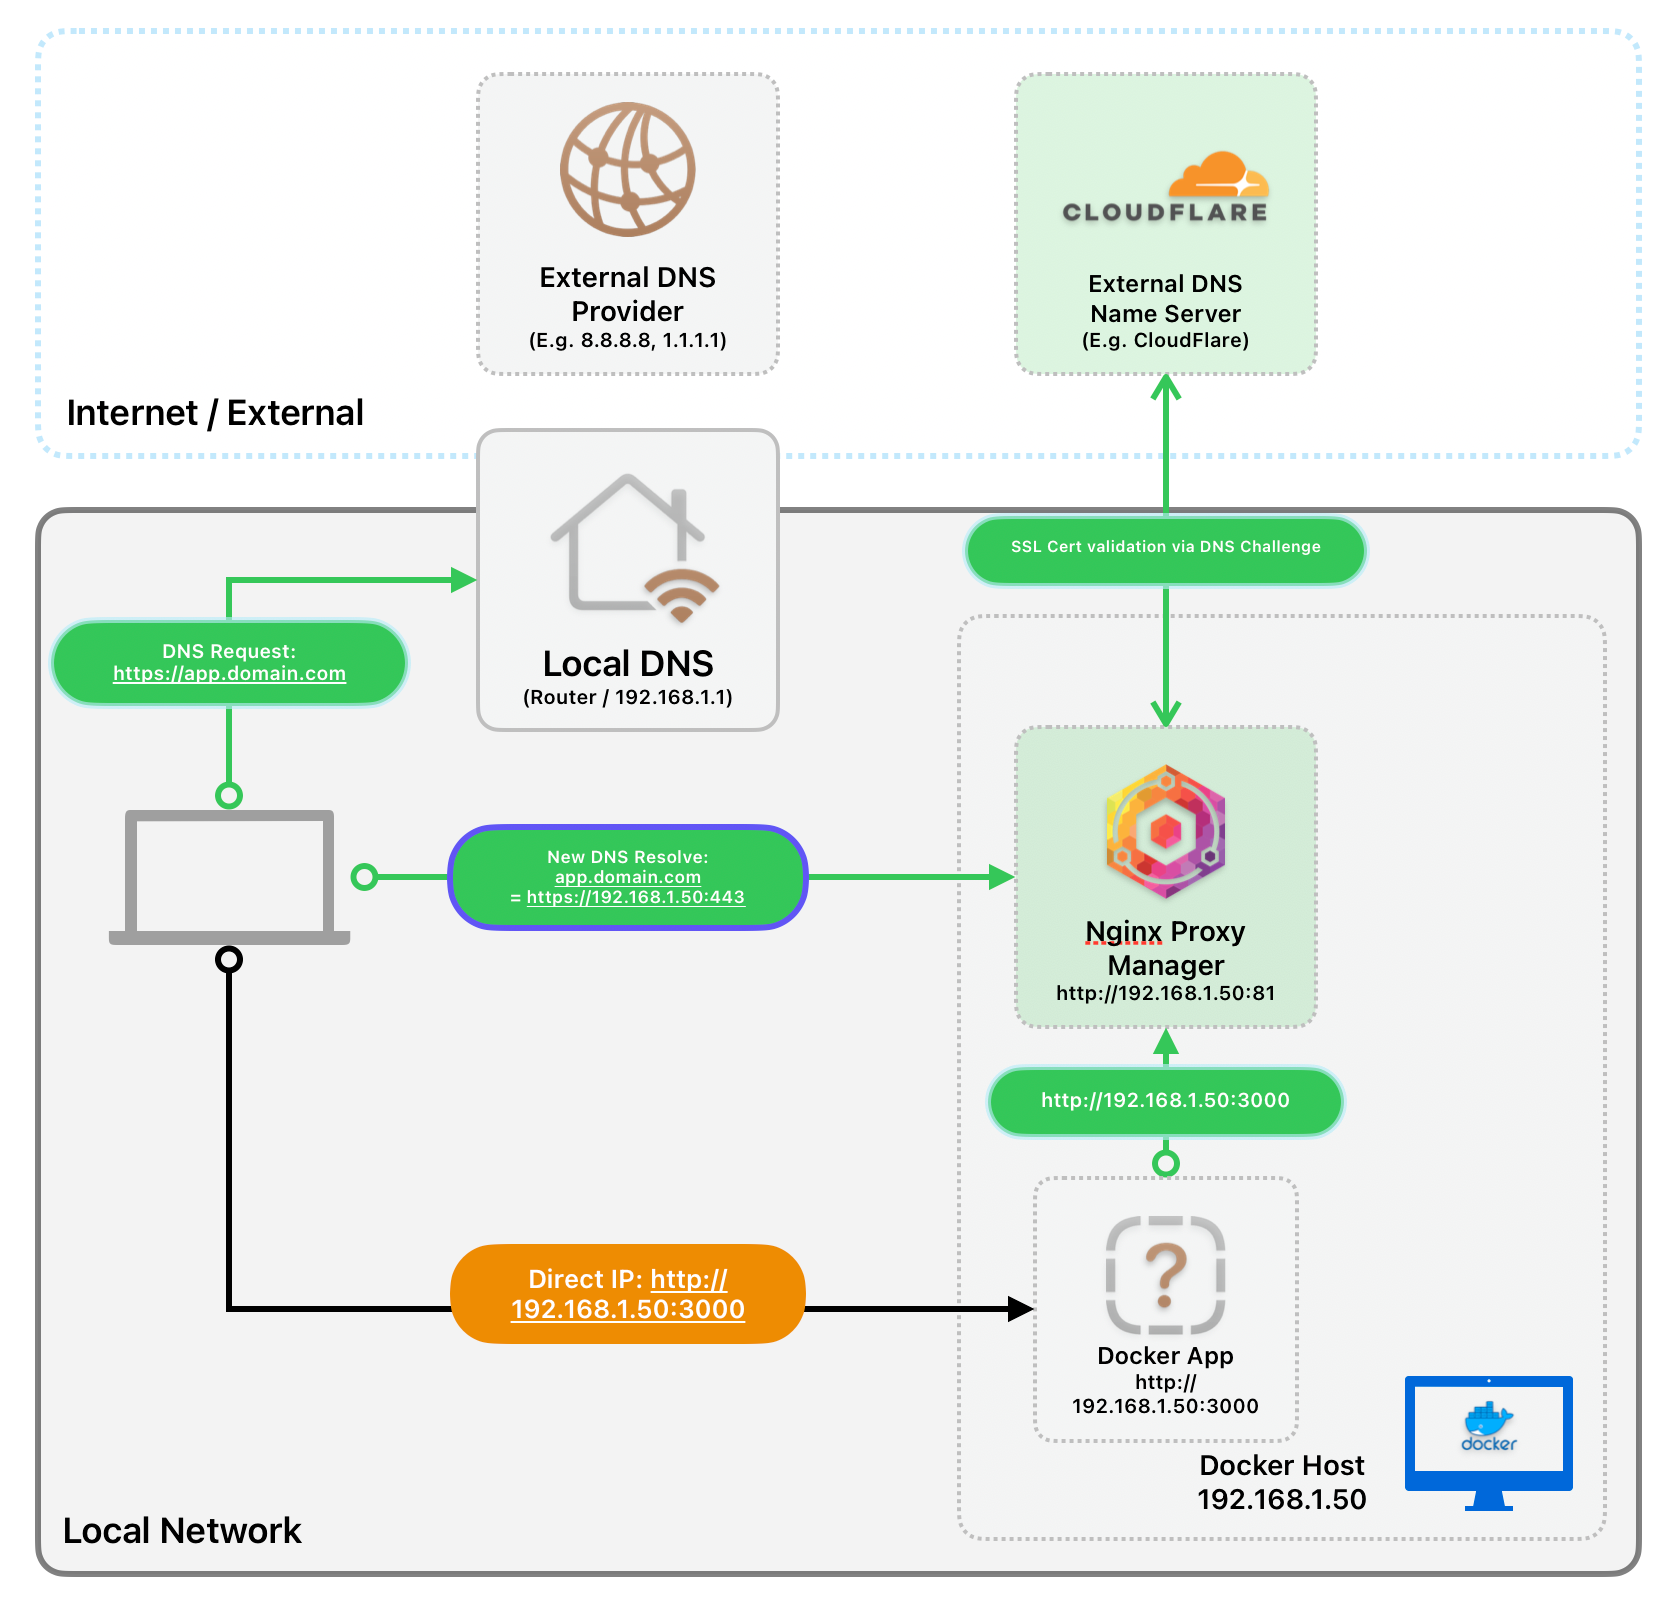
On the 'internet' it is called 'External DNS'. At home on your 'local network', it is called 'Local DNS', it can be defined on your local router so when you type in http://myapp.com it'll route to what you defined. We could use external DNS but that's pointless for local only set-ups (for now...)
So after you set-up a Reverse Proxy & Local DNS, when you put in 'app.domain.com' into your internet browser, you'll be served that website. You don't need to input 'http://192.168.1.50:3000/' each time!
That's not all that is handy when it comes to a reverse proxy. These days it can sort out SSL Certificates creation, so your apps are considered 'trusted' and secure (look if you're serving a 'bad app', the reverse proxy can't help you dress up and secure 'garbagé', it is still going to be garbagé) and also, plate up the app nicer (e.g. route the port 3000 as 443) so people don't need to remember port numbers.
Enough analogies, lets start building, before we start I'm going to make some assumptions on all the following:
Difficulty, Tech Stack & Requirements
- Difficulty: Novice enthusiast. You will need to understand your way around a terminal. Know basics of
sshand terminal text-based editors. - Time Required: 45 minutes
- Tech Stack / Requirements:
- You have Docker + Docker Compose Installed: go here if you don't
- You have an app / container deployed via Docker and it is exposed on a port
- You have access to your Network Router's DNS Record admin settings
- You have purchased a domain name (required for SSL Certificates)
Cloudflare DNS Registrar is highly recommended if you need an external Domain name! https://www.cloudflare.com/en-au/products/registrar/
Part 1. Setting-up NGINX Proxy Manager
The following instructions are for Linux and MacOS users:
- Open up your local Terminal (command prompt.exe / terminal.app)
- Create a new directory using the command
mkdir ~/nginx-proxy-manager && cd ~/nginx-proxy-manager)- If you get a permissions error, e.g. on Ubuntu, you'll need to prefix the command with
sudoand enter the password
- If you get a permissions error, e.g. on Ubuntu, you'll need to prefix the command with
- Create a new file with
touch docker-compose.yaml - Edit that file with
nano docker-compose.yaml- Copy the contents below, and paste it in
- Hit
ctrl+oto write to file, thenctrl+xto quit nano
services:
  app:
    image: 'docker.io/jc21/nginx-proxy-manager:latest'
    restart: unless-stopped
    ports:
      - '80:80'
      - '81:81'
      - '443:443'
    volumes:
      - ./data:/data
      - ./letsencrypt:/etc/letsencrypt
docker-compose.yaml
- Use
cat docker-compose.yamlto validate the contents of the file we just made. It should look like the above - Use
docker compose up -dto start the containers up. Give it a minute and then in your browser, open up one of the following:- If you set-up NPM locally on your Mac/Windows/Linux, go to http://localhost:81/ in your web browser
- If you set-up NPM on another system, go to that IP address with :81 appended. Example: http://192.168.1.1:81/
- You should now see the start-page of Nginx Proxy Manager. Using the following credentials to sign in and set-up a new account.
- User: admin
- Pass: changeme
- You've set-up the base of NGINX Proxy Manager, we'll now move to External DNS for SSL Certificate generation
Part 2. SSL Certificate Generation with External DNS (Cloudflare) & NGINX Proxy Manager
At this point we will need to do some work with your External DNS provider to generate a SSL Certificate. I highly recommend Cloudflare DNS as they provide DNS API functions on top of many other free functions which I'll introduce in other posts.
- Sign into your Cloudflare Account: https://dash.cloudflare.com/login
- Navigate to 'Manage Account > API Tokens' and select 'Create Token'
- Select 'Edit zone DNS' from the list
- Edit the 'Token Name' for friendliness
- Update the Zone Resources to either 'All Zones' or specify your Domain

- Select Continue to Summary, review the summary and then hit 'Create Token'
- Copy the API Token from Cloudflare and store it for safe keeping.
- Back in Nginx Proxy Manager, sign into it if you already have not
- Go to SSL Certificates and select 'Add SSL Certificate'
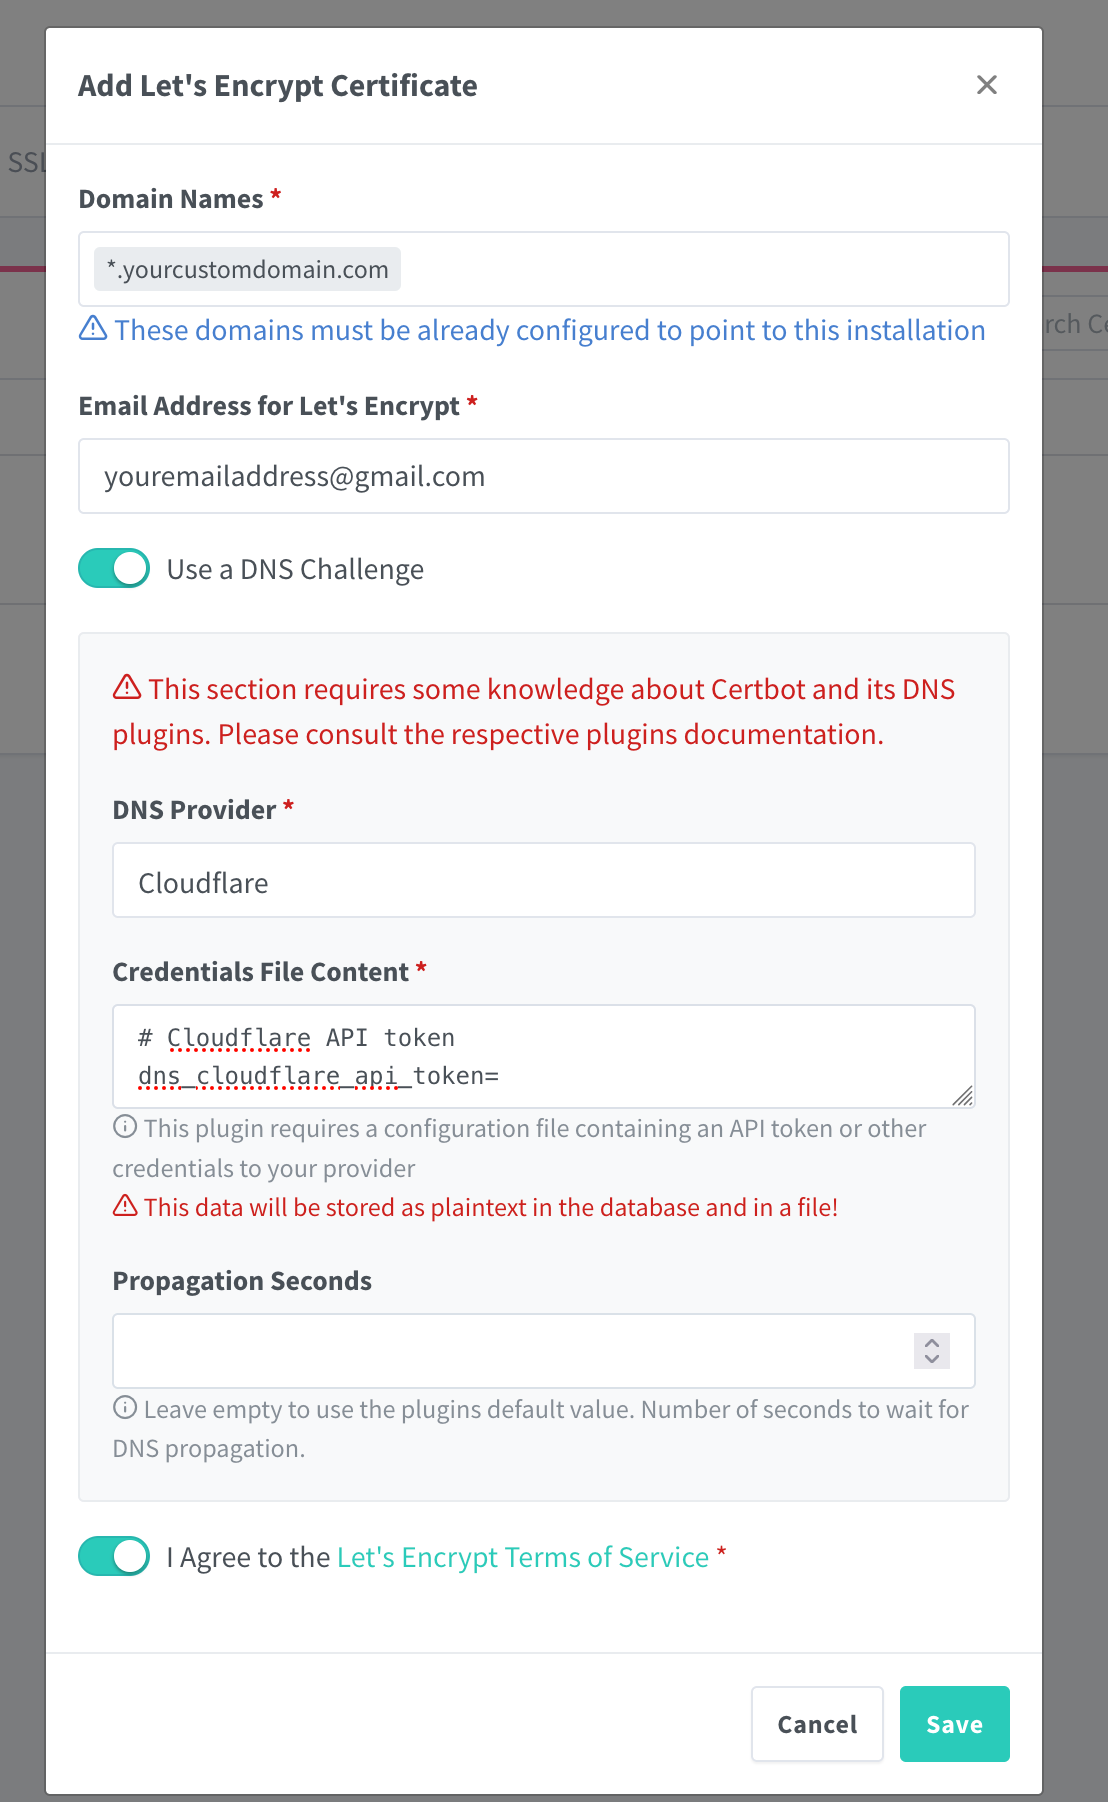
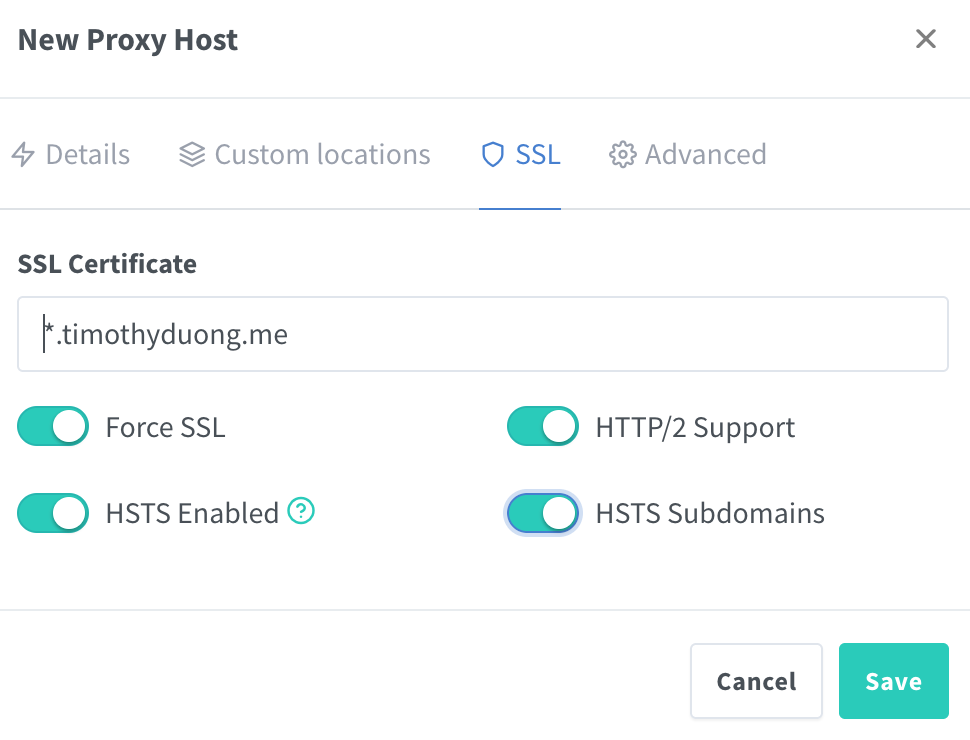
- Fill out the details, make sure you're requesting a 'wildcard' certificate, which means the domain should have a
.before it. E.g. My domain istimothyduong.meso i'll input*.timothyduong.meinto the Domain Names section.- Domain Names: Enter Wildcard Domain name
*.example.com - Email: Your email address (required to validate)
- Enable 'Use a DNS Challenge' ✅
- DNS Provider:
Cloudflare(or your respective provider, not all offer DNS Challenge) - Credentials File Content:
dns_cloudflare_api_token={WHAT YOU COPIED EARLIER}make sure to update this value, remove the brackets - Accept the TOS and select 'Save'
- Domain Names: Enter Wildcard Domain name
- A SSL Certificate should appear in the list and the SSL Certificate should be generated. We are onto the next step.. Local DNS!
Part 3. Creating Local DNS Record to point to the Reverse Proxy
Now, we're onto the second last part, which is Local DNS. Since everyone has a different way of editing Local DNS, I will assume that DNS is being set by your local network's router / gateway, the following instructions are guidelines to help you update your local DNS and are not the rule.
- If you have a router provided by your Internet Provider, I would recommend going to that device and lifting it up, it will be the best place to start, it should give you the IP address, username and password to change your local DNS settings.
- In your Internet Browser (Google Chrome, Safari, Edge), open up http://192.168.1.1/ or http://192.168.0.1/, it should load a page that is your router.
- If those didn't work, read this: https://www.security.org/vpn/find-router-ip-address/
- Once you get prompted / asked for username / password, once again, I'll take a guess. The best place to find the password is under the router or online by searching your device model and 'what is the password'. Common combinations are:
- admin / admin
- admin / password
- Once you are signed in, you will need to poke around', cause all different router configuration pages are... varying in usability. We're looking for 'Domain Name' or 'DNS Records', most routers have the capability to change this, if you're still stuck, read-up the manual!
- Once you're in that config menu, lets enter the following:
- Domain:
app.domainname.comthis should be the domain you would like to enter in to get to your app. It should be aligned to your external domain name so we can use the wildcard SSL Cert. - IP:
the ip address of nginx proxy manager(Do not put port numbers!) - Hit Save
- Domain:
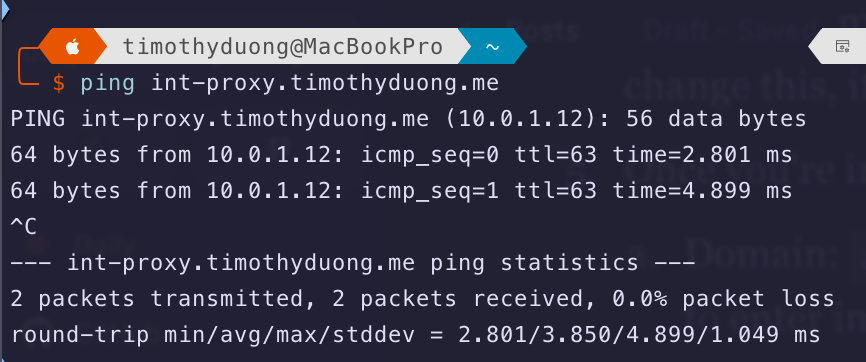
- Once the DNS record is saved, you can test by opening terminal.app and using either
ping app.domain.com, replacing app.domain.com with the domain you just set-up ornslookup app.domain.com- If it doesn't resolve, you may need to flush dns. Google how to do it for your operating system:
- MacOS:
sudo dscacheutil -flushcache; sudo killall -HUP mDNSResponder - Windows:
ipconfig flushdns - Ubuntu/Debian:
sudo resolvectl flush-caches
- MacOS:
- If it doesn't resolve, you may need to flush dns. Google how to do it for your operating system:
- You should see the IP Address for NGINX Proxy Manager! If its not working, restart your computer or flush DNS again.
Part 4. Creating a Proxy Host in NGINX Proxy Manager
The final part is to create a 'Proxy Host' entry into Nginx Proxy Manager. That way, when a DNS request comes to NGINX for 'app.domain.com', it can serve content from 'destination IP' (e.g., 192.168.1.50)
- Open Nginx Proxy Manager on port 81 (e.g., http://nginx-host-ipaddress:81)
- Sign into it with the account you created earlier
- Select 'Add Proxy Host'
- Under 'Details' fill it out and add the relevant information on your end, below is an example:
- Domain name:
app.domain.com - Scheme:
http - Forward IP:
192.168.1.50 - Port:
8000 - Enable 'Socket Support' and 'Block common exploits'
- Domain name:
- Select 'SSL' and select the certificate from the dropdown
- Also enable all the 4 options like HSTS, Force SSL etc.

- From here if you go to your new Custom Domain, it should load your site!
No longer do you need to enter the example IP:Port of http://192.168.1.50:3000/ to access your site, but now you can access via the domain name: https://app.domain.com/
This domain for your app/webpage will make things:
- 🙋♂️ User Friendlier - No need to remember ip addresses and port numbers
- 🤖 Encrypted Comms - SSL will encrypt traffic between you and the server
- 🏠 Local Only - Available only when on local network, no need to expose anything online
- 🚫 No SSL Errors - No longer providing pesky certificate warning errors
The next article will walk-through how to publish a website publicly to-the-internet securely via Cloudflare Tunnels (AKA Cloudflared): https://blog.timothyduong.me/publishing-an-app-using-cloudflare-tunnels/


Member discussion