Proxmox, Dockered Jellyfin & a Nvidia 3070TI


This is a post for anyone that has Ubuntu VM running on a Proxmox Baremetal Host with an Nvidia GPU and would like to pass-through the PCI through to your Docker Container.
I found myself waddling through online 'documentation' (more like end-user duct-tape guides) and found that it was not as complicated as I thought only after going through the pain of trying to understand which of the configurations actually applied to me. I fortunately actually didn't need to check IOMMU tables and add driver blacklists to my Proxmox host.
What was my aim? To pass-through my GPU to my VM running Docker and into a container that hosted Jellyfin and then enable a configuration called 'Hardware accelerated encoding/transcoding'
Why hardware accelerated? Because I'm not longer using my GPU for desktop gaming and I want to speed up trickplay image creation in Jellyfin alongside freeing up CPU usage as I onboard more users to my Jellyfin server 😄
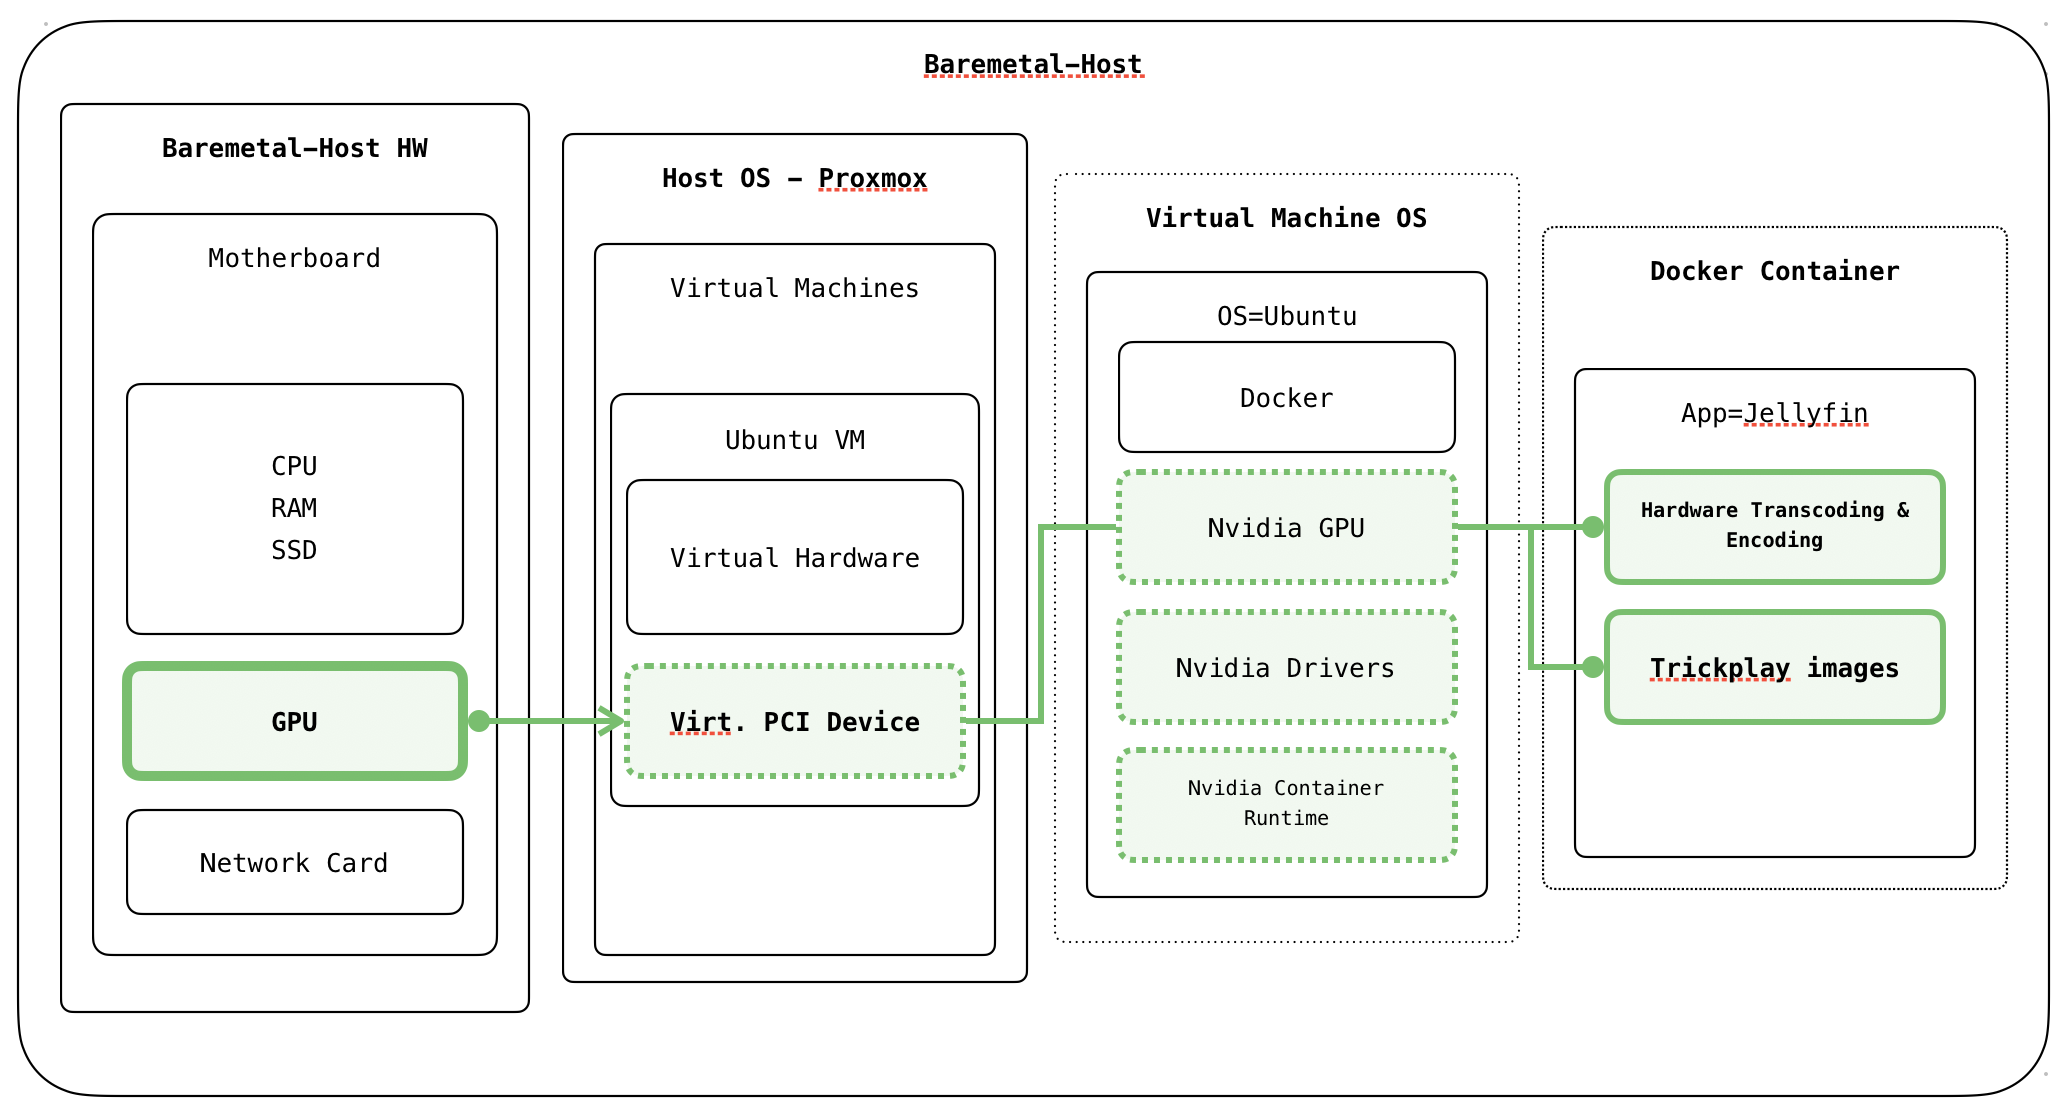
The below image with the green boxes is what I'm trying to achieve. If it does not make sense to you, I would stop reading this article here!
Prerequisites
Finding out what your hardware supports is a key step to enabling this successfully, since everyone would have a different set-up, ranging from the Motherboard/CPU combo to the GPU itself.
- Enable SVM in Motherboard CPU Configuration: For myself, I had a Asus x570 Motherboard AMD, paired with an AMD 5700X3D. The only thing I needed to enable was 'SVM' (Secure Virtual Machine) which is required for Proxmox to boot the Virtual Machines anyway. I did not require to enable SR-IOV (My GPU does not support vGPU and I don't want to achieve Bifurcation)
- Working Proxmox & Ubuntu VM deployed: This article will not go through deployment of a Ubuntu VM and/or Docker on that VM.
- If you need to learn how to set-up Promox check out Proxmox's VE Guide
- If you need to learn how to create a Ubuntu VM in Proxmox, check out this guide by SelvarajK
Limitations
- Enabling GPU Pass-through apparently impacts server back-ups & restore. I've yet to test this.
Now if you got up to here and just want the instructions, follow on and note, the article is broken into 3 Parts:
- Part 1: Creating a GPU PCI Device on Proxmox Host
- Part 2: Enabling the PCI Device in VM & Docker
- Part 3 - Enabling Hardware Transcoding in Jellyfin
Part 1: Creating a GPU PCI Device on Proxmox Host
The following section walks us through creating a PCI Device from a pre-existing GPU that's installed physically to the Proxmox Host (e.g. Baremetal)
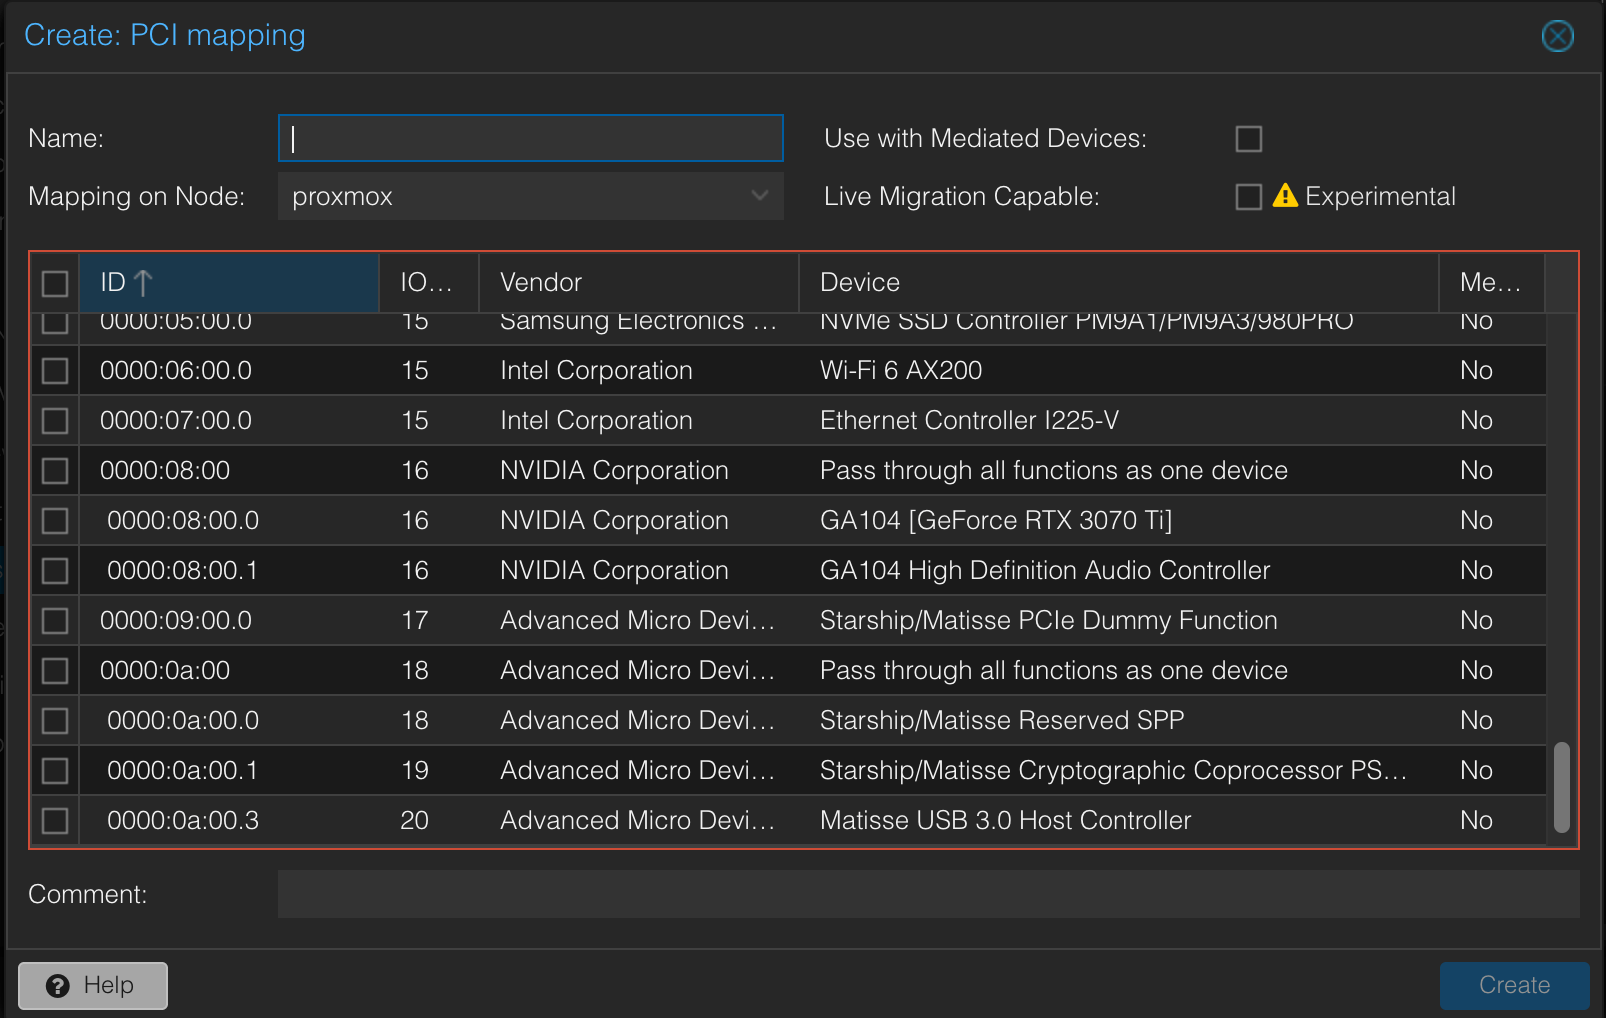
- Log into your Proxmox environment as administrator and navigate to Datacenter > Resource Mappings > PCI Devices and select 'Add'
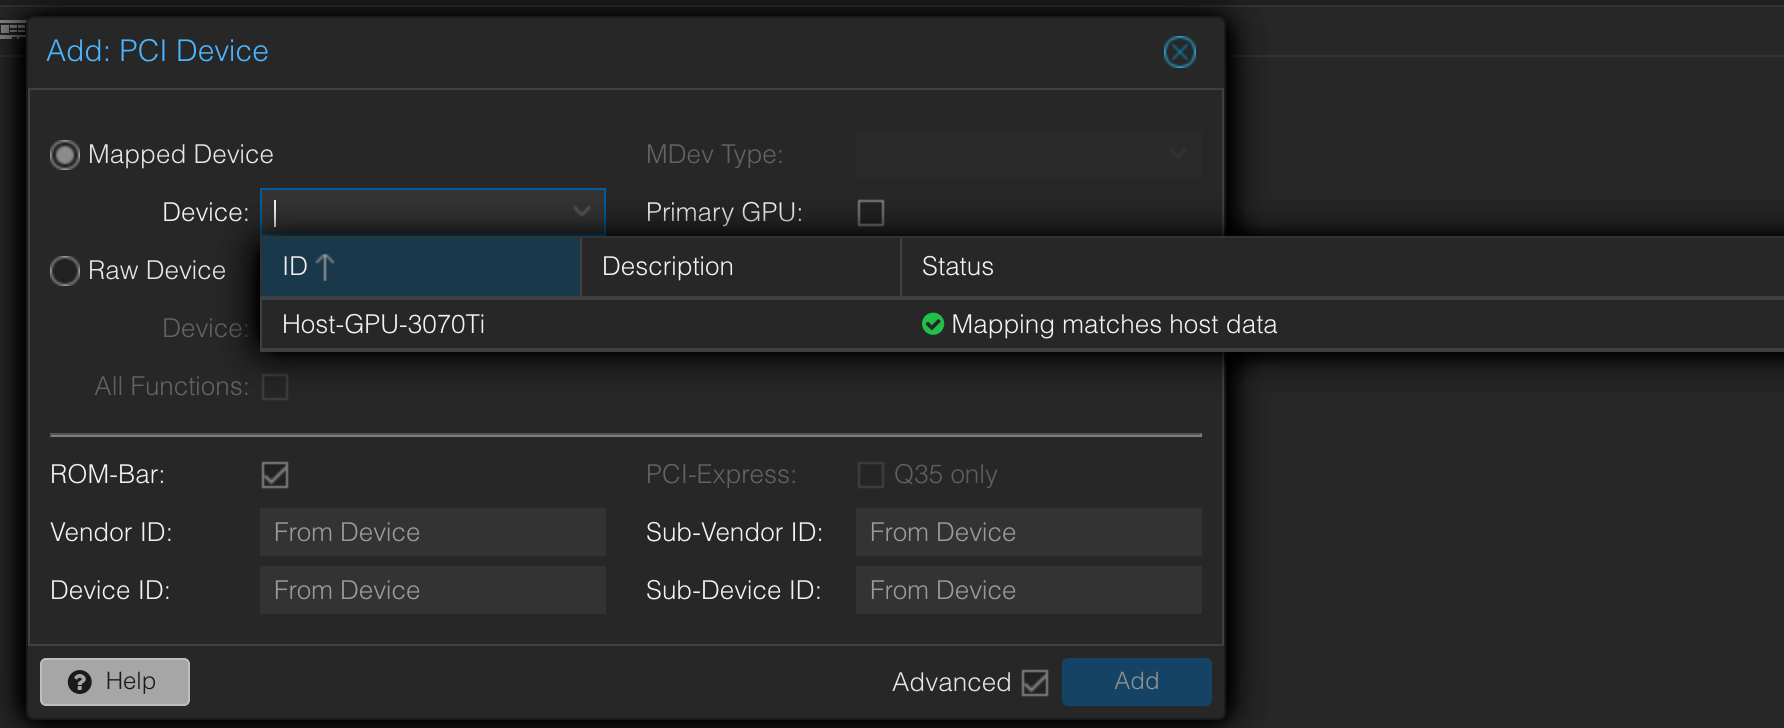
- A pop-up screen will appear as seen below. It will be your 'IOMMU' Table, you will need to find your card. In my case, I selected the GeForce RTX 3070 Ti card and not 'Pass through all functions as one device' as I did not care for the HD Audio Controller. Select the appropriate device and name it too then select 'Create'
- Name: host-gpu-nvidia-3070ti
- Selection: select the GPU from the table
- Comment: Add a comment if you want to, e.g. a note if you will
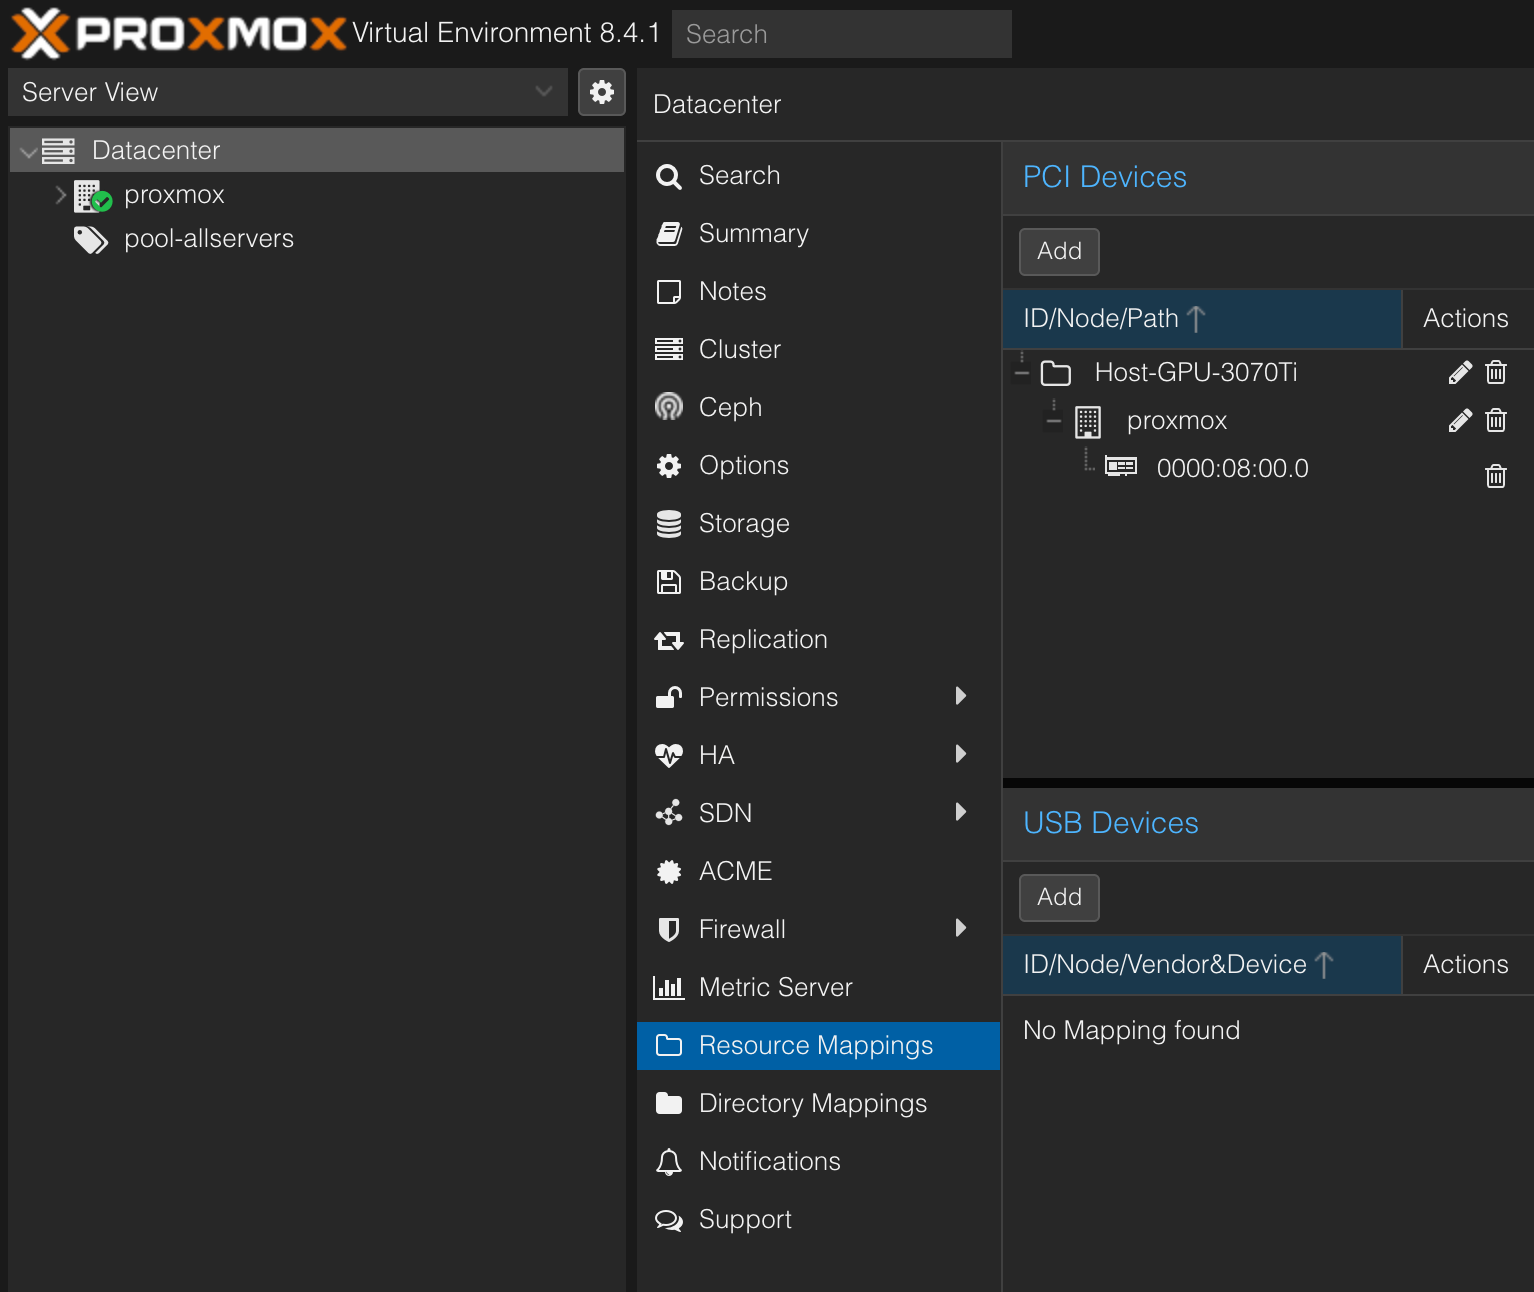
- Your GPU / PCI Device should appear now, as seen below in my example as 'Host-GPU-3070Ti'
- The next step is to assign the GPU to your Docker Host VM, in my example, I am using Ubuntu. Navigate to your Proxmox Node and locate your VM, select its 'Hardware' > add 'PCI Device' and select the GPU we added earlier.
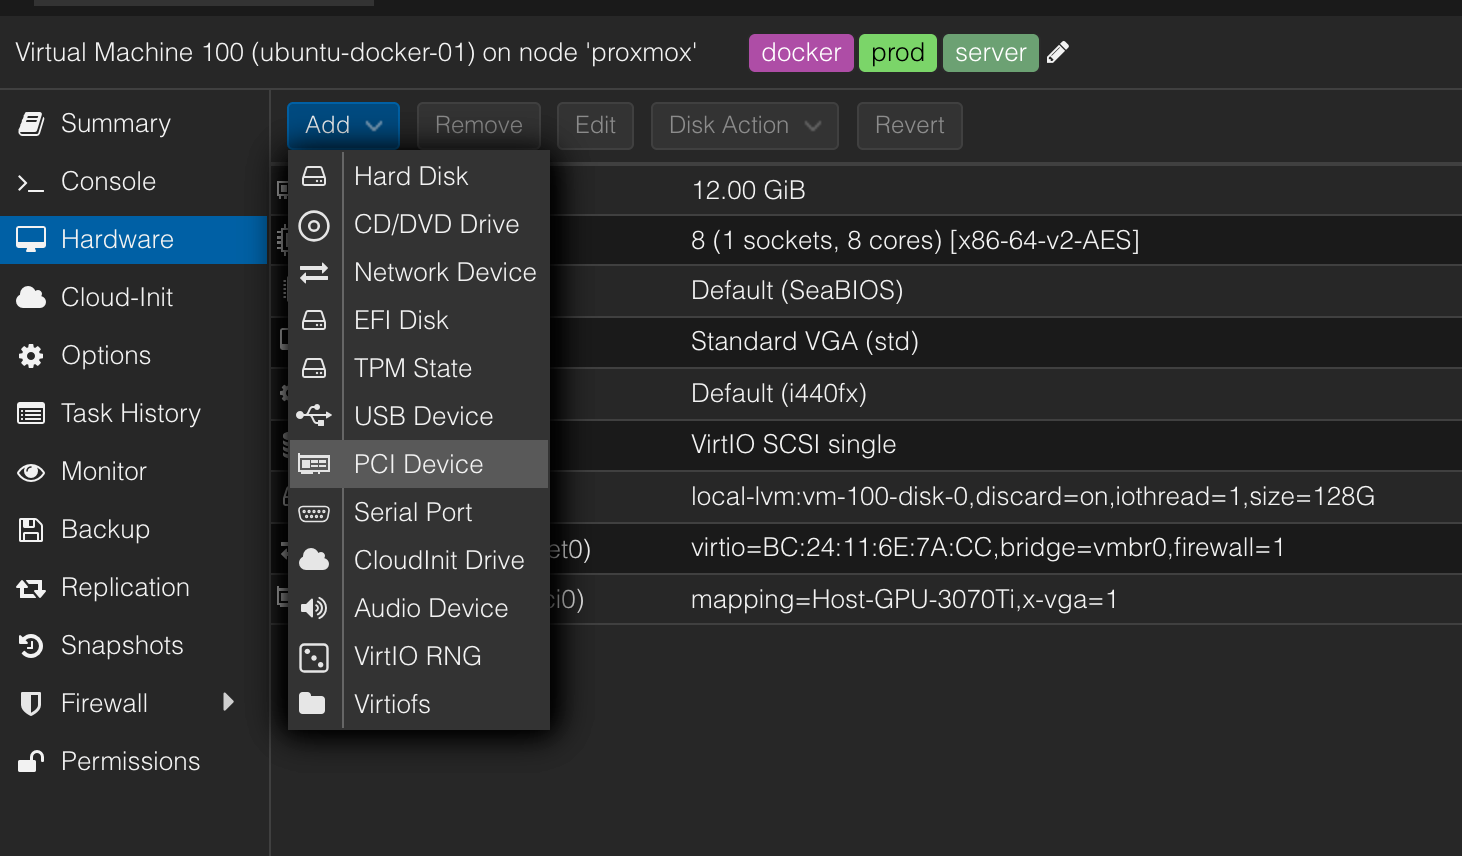
- Select 'Add' and the GPU should be added as 'Green' to the VM which means it's attached but not yet initialised. Reboot the VM.
- Once rebooted, log into the Linux VM and run the command
lspci | grep -e VGA
This will grep output all 'VGA' devices on PCI:

- Take a breather, make a tea/coffee, the next steps now are enabling the Nvidia drivers and runtimes to allow Docker & Jellyfin to run-things.
Part 2: Enabling the PCI Device in VM & Docker
The following section outlines the steps to allow the VM/Docker Host to use the GPU in-addition to passing it onto the docker container (Jellyfin in my case).
- By default, the VM host (Ubuntu) should be able to see the PCI Device, after SSH'ing into your VM Host, run
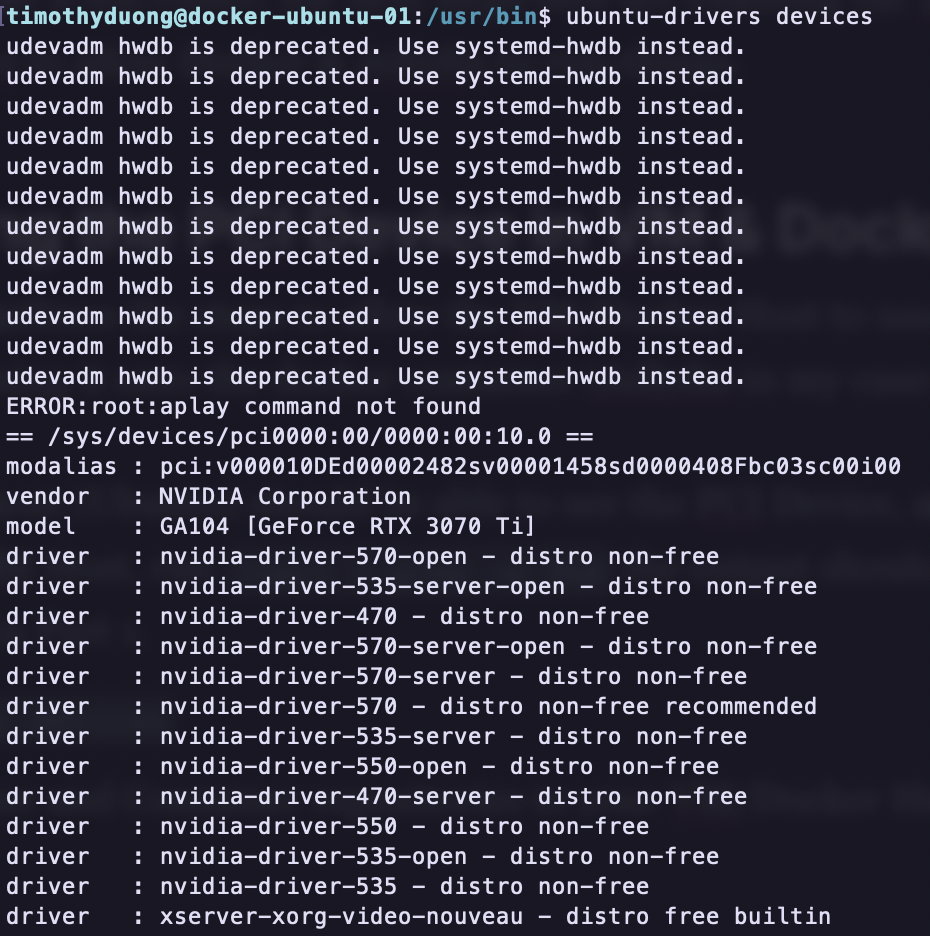
lspci | grep -e VGAthe output should be similar to step 7 from Part 1. - Run
ubuntu-drivers devicesthis command will out available drivers for the PCI devices.
- Install the Nvidia Driver - Choose either Option A or Option B. I recommend B.
- Simple / automation Option: Run
sudo ubuntu-drivers autoinstallto install the 'recommended' version automatically - Custom / Choose the version Option: Run
sudo apt install nvidia-driver-XXX-server-openreplacing XXX with the version you'd like if you want to server open-source version.
- Simple / automation Option: Run
- After the installation, run
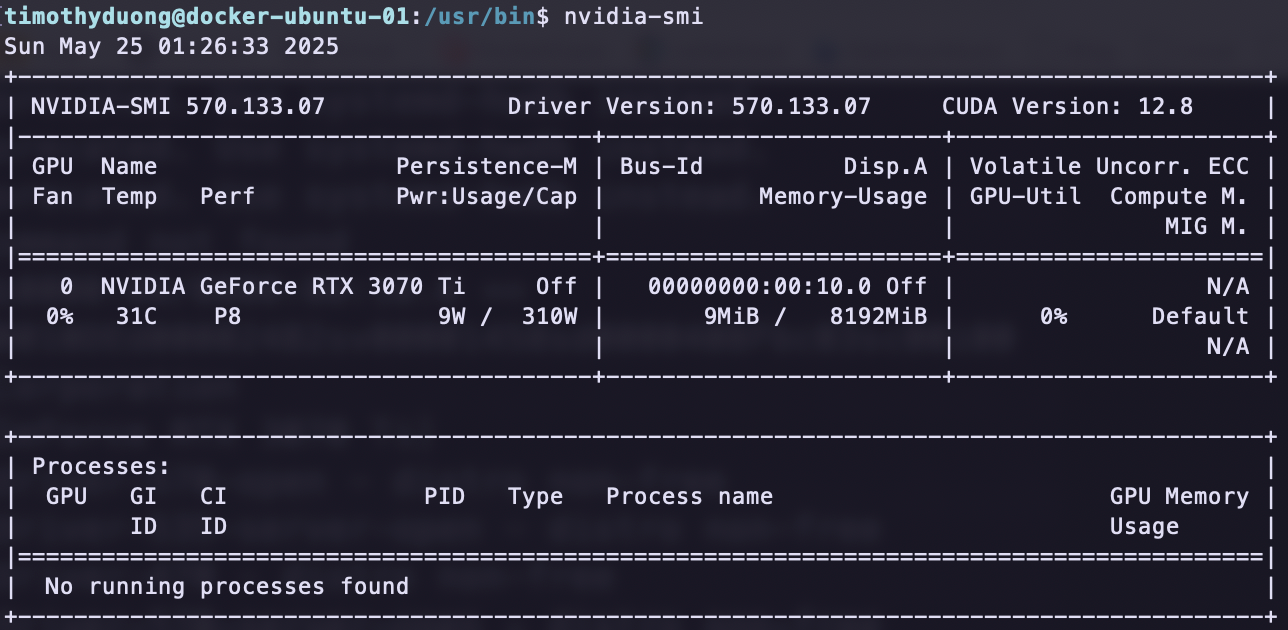
sudo rebootto reboot the VM/Docker Host - After reboot, run
nvidia-smito validate if the nvidia drivers were installed successfully and the GPU has been passed through to your Docker Host
- To get the GPU/Driver working with Containers, we need to first add the Nvidia Container Runtime repositories to your VM/Docker Host
Run the following command to add the open source repo:
curl -fsSL https://nvidia.github.io/libnvidia-container/gpgkey | sudo gpg --dearmor -o /usr/share/keyrings/nvidia-container-toolkit-keyring.gpg \
  && curl -s -L https://nvidia.github.io/libnvidia-container/stable/deb/nvidia-container-toolkit.list | \
    sed 's#deb https://#deb [signed-by=/usr/share/keyrings/nvidia-container-toolkit-keyring.gpg] https://#g' | \
sudo tee /etc/apt/sources.list.d/nvidia-container-toolkit.list- Then run
sudo apt-get updateto update all repos including our newly added one - Run
sudo apt-get install -y nvidia-container-toolkitto install the nvidia-container-toolkit to the docker host - Reboot VM/Docker-host with
sudo reboot - Check the run time is installed with
test -f /usr/bin/nvidia-container-runtime && echo "file exists." - The runtime is now installed but it is not running and needs to be enabled for Docker, use the following commands
sudo nvidia-ctk runtime configure --runtime=dockersudo systemctl restart dockersudo nvidia-ctk runtime configure --runtime=containerdsudo systemctl restart containerd
- The nvidia container toolkit runtime should now be running, lets head to Jellyfin to test! Or of course, if you're using another application, you're good from here.
Part 3 - Enabling Hardware Transcoding in Jellyfin
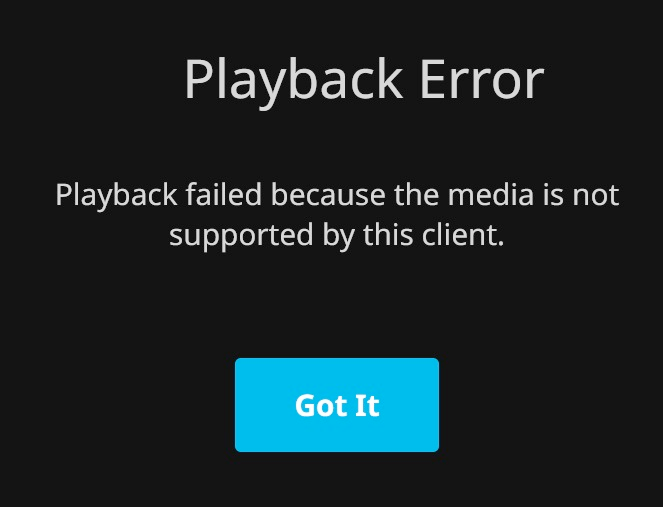
- Your Jellyfin should currently be working but Hardware Acceleration for Transcoding is disabled. Even if you did enable 'Nvidia NVENC' it would still not work and any video should you try would error with:
- We will need to update our Docker Compose file and re-deploy the stack/containers. Append this to your Docker Compose File.
runtime: nvidia
deploy:
  resources:
    reservations:
      devices:
        - driver: nvidia
          count: all
          capabilities: [gpu]
- My docker file now looks like this:
services:
  jellyfin:
    image: 'jellyfin/jellyfin:latest'
    container_name: jellyfin
    environment:
      - PUID=1000
      - PGID=1000
      - TZ=Australia/Sydney
    volumes:
      - '/path/to/jellyfin-config:/config' # Config folder
      - '/mnt/media-nfsmount:/media' # Media-mount
    ports:
      - '8096:8096'
    restart: unless-stopped
    # Nvidia runtime below
    runtime: nvidia
    deploy:
      resources:
        reservations:
          devices:
            - driver: nvidia
              count: all
              capabilities: [gpu]
Full docker-compose file, update with your variables accordingly
- Log into your Jellyfin as administrator and go to 'Dashboard'
- Select 'Playback' > Transcoding
- Select 'Nvidia NVENC' from the dropdown menu
- Enable any/all codecs that apply
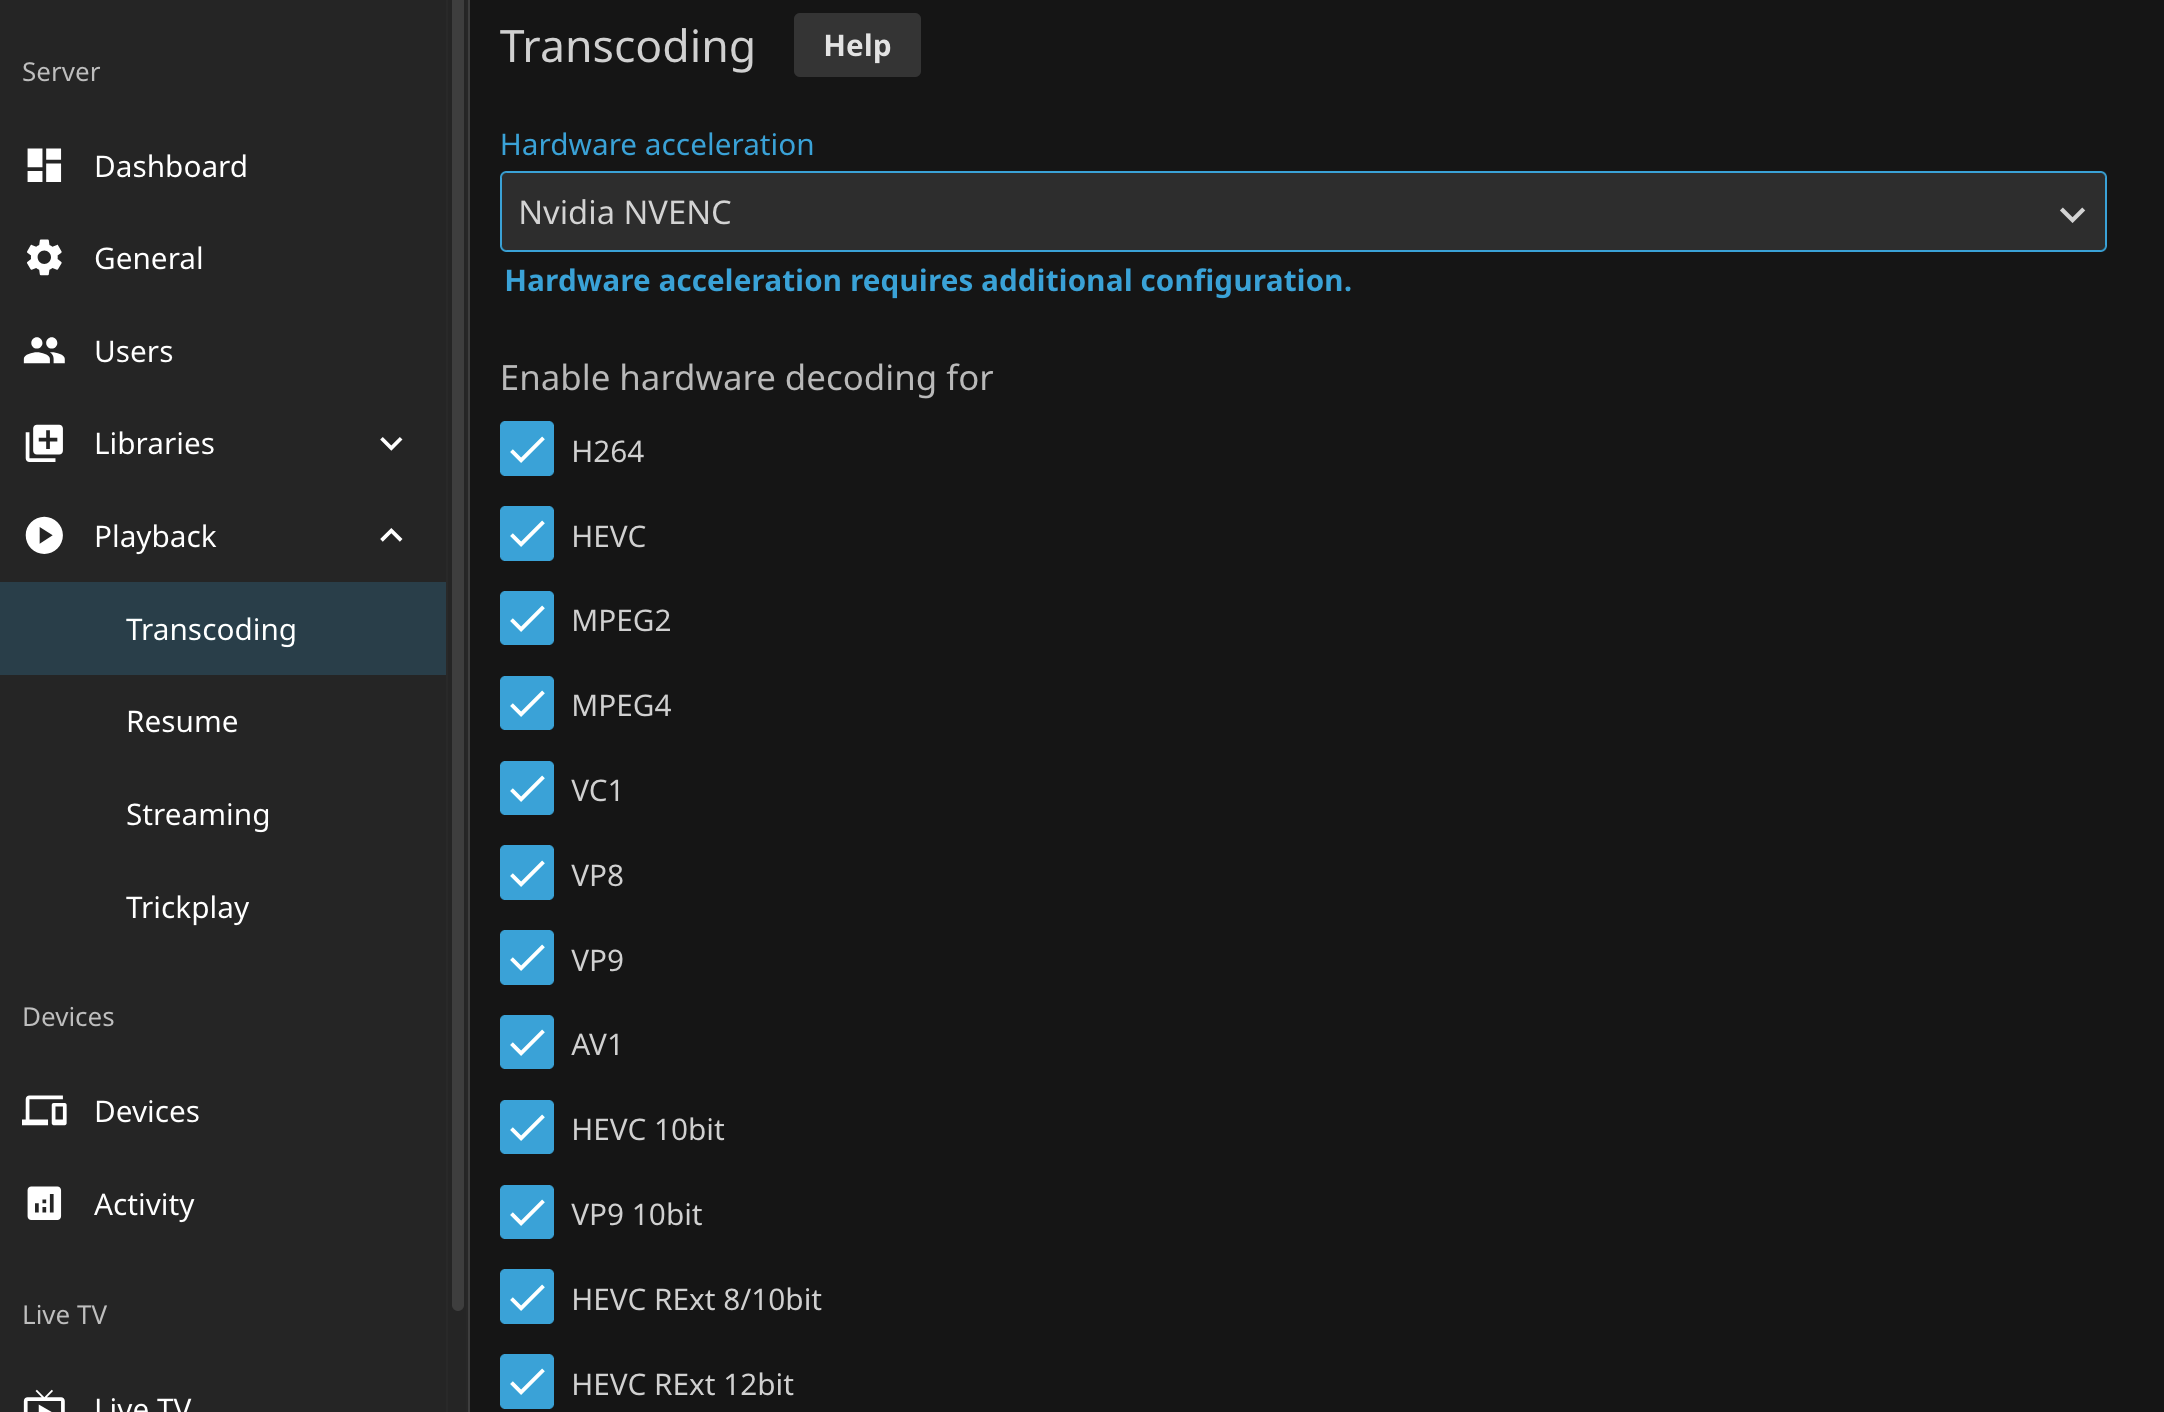
- Select 'Save' at the bottom
- Go back to your library and select any media to play.
- Voila, you should be able to play without that error "Playback Error
- Playback failed because the media is not supported by this client.
Happy Watching!
For the nerds, my transcoding stats for a Bluray 4k Rip (3840x2160) HEVC to H264 with HDR tonemapping disabled. For my set-up, GPU transcoding is 4-times faster!
- Before (CPU AMD 5700x3d): CPU-based transcoding framerate = 30 fps (1.25x)
- After (GPU RTX 3070ti): GPU-based transcoding framerate = 148fps (6.17x)
Thanks to the following resources on helping me achieve this:


Member discussion